- My Forums
- Tiger Rant
- LSU Recruiting
- SEC Rant
- Saints Talk
- Pelicans Talk
- More Sports Board
- Fantasy Sports
- Golf Board
- Soccer Board
- O-T Lounge
- Tech Board
- Home/Garden Board
- Outdoor Board
- Health/Fitness Board
- Movie/TV Board
- Book Board
- Music Board
- Political Talk
- Money Talk
- Fark Board
- Gaming Board
- Travel Board
- Food/Drink Board
- Ticket Exchange
- TD Help Board
Customize My Forums- View All Forums
- Show Left Links
- Topic Sort Options
- Trending Topics
- Recent Topics
- Active Topics
Started By
Message
repairing a hole in sheet rock
Posted on 2/10/23 at 10:34 am
Posted on 2/10/23 at 10:34 am
I have a 2 inch round hole in sheet rock that I need to fill-in to paint.
Any suggestions on what to use?
thanks
Any suggestions on what to use?
thanks
 10
10


Posted on 2/10/23 at 10:37 am to TigerKurt
get a square, trace the square around the hole and use a thin piece of wood once you cut it out to secure it 
Two screws one above one below and fasten the new piece of sheetrock to the board. PROFIT!
Two screws one above one below and fasten the new piece of sheetrock to the board. PROFIT!
Posted on 2/10/23 at 10:42 am to TigerKurt
Just buy a kit and mud it in. Kits usually come with a pre-cut square or circle with a paper flange.
Insert/glue it in with mud, then smooth it out. Finish it however (mud, sand, texture) you like, then paint.
Insert/glue it in with mud, then smooth it out. Finish it however (mud, sand, texture) you like, then paint.
Posted on 2/10/23 at 12:16 pm to TigerKurt
Old drywall guy taught me this method. Get a new piece of drywall, and chip off what you don't need to make the shape of the hole.


Posted on 2/10/23 at 12:26 pm to TigerKurt
go buy a repair kit from any hardware store. simple

Posted on 2/10/23 at 12:26 pm to TigerKurt
At some point you will need a wet sponge or sandpaper.
Posted on 2/10/23 at 12:55 pm to TigerKurt
Easiest way OP from someone that owns rental homes if its a legit 2 inch gap and not much bigger is to get some foam gap filler, you can fill a hole that big easily with that. Spray it on the inside around the hole so it sticks to the backside of the drywall. Then when it dries after about 30 mins you take a razor blade and cut it flat/ flush with the wall. Try and get it cut slightly inside the wall, so its not sticking out. Spackle over that smooth. I've done this 1oo times and works great for holes that are 1-3 inches.
Also, don't get the crappy spackle. Use regular drywall mud not the crap they sell you for holes. The hole stuff is harder to use, not as smooth and dries too fast for the avg DIY job.
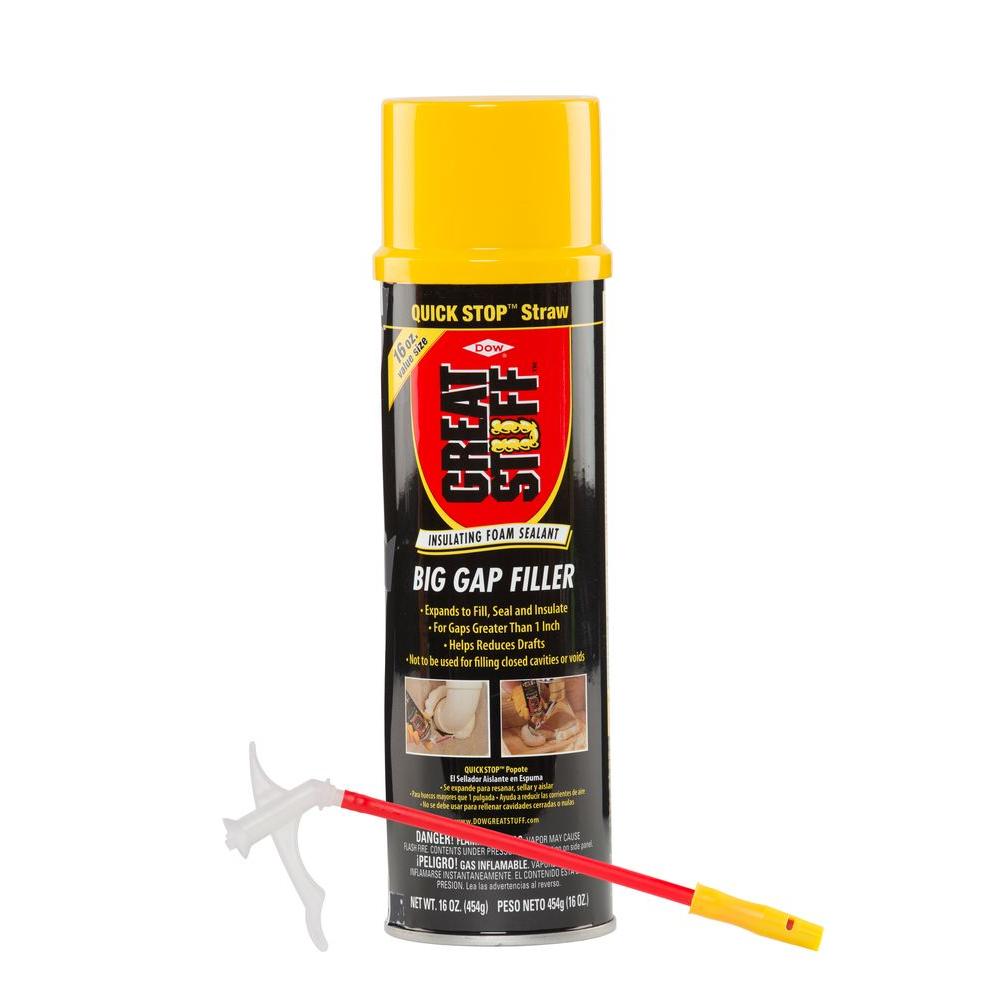
Also, don't get the crappy spackle. Use regular drywall mud not the crap they sell you for holes. The hole stuff is harder to use, not as smooth and dries too fast for the avg DIY job.
This post was edited on 2/10/23 at 1:00 pm
Posted on 2/10/23 at 8:41 pm to Shexter
quote:
Butterfly patch. Super easy and effective for small repairs.
Posted on 2/10/23 at 10:22 pm to GeauxldMember
Thats a california patch.
Posted on 2/10/23 at 10:59 pm to TigerKurt
You'll probably need the orange peel spray too. This puts the texture back on the wall.
Posted on 2/11/23 at 11:32 am to TigerKurt
Just YouTube it and you’ll get a better idea of what you need to do
Posted on 2/12/23 at 9:30 am to baldona
I don’t know why my gap filler is getting downvotes because for small holes like 2” it’s by far the easiest and fastest. Butterfly/ california/ whatever you want to call it patches work great for 3-5” holes. But if you go larger then that you really want some support in the back.
You don’t want to put a a screw or whatever in a patch like this anyway. If you need to do that you really should cut back to the studs and screw into the studs.
You don’t want to put a a screw or whatever in a patch like this anyway. If you need to do that you really should cut back to the studs and screw into the studs.

Posted on 2/12/23 at 1:48 pm to idlewatcher
quote:
get a square, trace the square around the hole and use a thin piece of wood once you cut it out to secure it Two screws one above one below and fasten the new piece of sheetrock to the board. PROFIT!
Learned from someone on this board to use paint stir sticks for the wood.
TYFYS H&G posters!
Posted on 2/13/23 at 9:21 am to TigerKurt
Fixing the hole is the easy part. It's the mudding and matching texture. Its impossible for me.

Posted on 2/13/23 at 2:33 pm to TigerKurt
I take furring strips and put behind existing board, then cut to fit and secure plug/patch to strips. Then float in, sand, float, sand, texture paint.
Posted on 2/15/23 at 9:07 am to Shexter
I used to finish sheet rock in a previous life and this is how we always did it.

Posted on 2/15/23 at 11:42 am to PlaySomeHonk
Genuine question
When you do these repairs do you repaint the entire wall to make it blend in?
When you do these repairs do you repaint the entire wall to make it blend in?
Posted on 2/15/23 at 12:18 pm to tunechi
If you use exactly the same paint, it should match and blend-in fine. You might have to give the repaired area 2 coats if the rest of the wall has 2 coats.
Posted on 2/15/23 at 7:37 pm to tunechi
If you have some of the paint used for the walls initially, you may be able to only touch up the repair spot. Flat paint touches up best….egg shell not as good. I’d try touching up first and if it doesn’t meet your expectation, repaint that wall.
Posted on 2/15/23 at 10:20 pm to Shexter
I had about a 3" hole in sheetrock. I used a keyhole saw to make the hole into a rectangle. I then took a paint stick and cut it approx. 6" long. Then I pushed the paint stick down in the hole while holding it with a couple of fingers and pulled it tight behind the wall positioned vertically behind and straddling the hole. While still holding the paint stick behind the hole with my left hand, I used my right hand to install 2 flat head screws through the sheetrock above the hole and two screws below the hole. The 4 screws secured the paint stick securely behind the sheetrock across the hole. Then I cut a rectangular piece of sheetrock the same size as the hole and used 4 more flat head screws to secure the sheetrock patch to the paint stick. That made a really sturdy repair. Then I used sheetrock tape and mud to finish the repair before painting
This was a similar but stronger repair than the one pictured in a previous post. This kind of repair can be used for larger holes using larger pieces of wood. I.e., if you had a 6" square hole, you could secure a piece of 1x4 wood behind and across the hole with screws and then secure a sheetrock patch to the 1x4 wood.
EDIT: I didn't notice previously, but my solution is pretty much identical to tigerfoot's solution using furring strips behind the hole. I just added some detail about how to get the wood piece secured behind the hole. You could also use multiple pieces of wood behind larger holes. Once you understand the concept, just use whatever appropriately sized wood you have on hand that you can get secured behind the hole so that you can screw down a sheetrock repair piece. Or go buy a piece of wood (or get some free paint sticks!) if you need to.
This post was edited on 2/15/23 at 10:47 pm

 Page 1 of 1


Popular
Back to top