- My Forums
- Tiger Rant
- LSU Recruiting
- SEC Rant
- Saints Talk
- Pelicans Talk
- More Sports Board
- Fantasy Sports
- Golf Board
- Soccer Board
- O-T Lounge
- Tech Board
- Home/Garden Board
- Outdoor Board
- Health/Fitness Board
- Movie/TV Board
- Book Board
- Music Board
- Political Talk
- Money Talk
- Fark Board
- Gaming Board
- Travel Board
- Food/Drink Board
- Ticket Exchange
- TD Help Board
Customize My Forums- View All Forums
- Show Left Links
- Topic Sort Options
- Trending Topics
- Recent Topics
- Active Topics
Started By
Message
Building closet. Drywall question.
Posted on 7/28/19 at 11:53 am
Posted on 7/28/19 at 11:53 am
Door frame is 4" deep. With stud being 3.5", do i need 1/4 drywall for each side or is it possible to still do 3/8" or 1/2" and it still work out?
 5
5

Posted on 7/28/19 at 12:13 pm to jmorr34
A standard interior wall consists of a two-by-four frame with one layer of 1/2-inch-thick drywall on each side, for a total thickness of approximately 4 1/2 inches. The depth of a standard door jamb is 4 5/8 inches, which provides an extra 1/8 inch to account for slightly thicker walls due to stud size variation.
Are you sure its 4 inches and not 4 5/8?
If it is a 4 inch door jam, you'll need to use 1/4 inch drywall.
Are you sure its 4 inches and not 4 5/8?
If it is a 4 inch door jam, you'll need to use 1/4 inch drywall.
Posted on 7/28/19 at 12:14 pm to jmorr34
Replace door with correct jamb width. Or fur it out to get to correct width with desired drywall thickness.
This post was edited on 7/28/19 at 12:15 pm
Posted on 7/28/19 at 12:36 pm to NATidefan
Box says it fits 4-4 7/8" jams. Measuring it it is 4"s.
Nothing special. Just a 36" prehung from HD
Nothing special. Just a 36" prehung from HD
This post was edited on 7/28/19 at 12:37 pm

Posted on 7/28/19 at 12:43 pm to jmorr34
Does the door jamb slide inside of itself? If so, it gives you the ability to adjust to the wall thickness.
Posted on 7/28/19 at 2:11 pm to jmorr34
just add a piece of 1/2" trim to it if need be or 1/4" trim on each side
dont make the house fit the door jam, make the door jam fit the house
dont make the house fit the door jam, make the door jam fit the house
Posted on 7/29/19 at 7:33 am to wickowick
quote:
Does the door jamb slide inside of itself? If so, it gives you the ability to adjust to the wall thickness.
This. Reason as to why the OP is getting 4".
Posted on 7/29/19 at 10:59 am to fishfighter
quote:
This. Reason as to why the OP is getting 4".
Ha, exactly. I didn't even realize it adjusted.
Few pics. Never floated drywall before either. Any tips?


This post was edited on 7/29/19 at 11:02 am
Posted on 7/29/19 at 11:23 am to jmorr34
I am not a drywall guy, but you drywall install has issues...
Posted on 7/29/19 at 11:26 am to wickowick
quote:
I am not a drywall guy, but you drywall install has issues...
I'm not either. Care to elaborate what the issues are?
This post was edited on 7/29/19 at 11:29 am
Posted on 7/29/19 at 5:01 pm to jmorr34
quote:
Care to elaborate what the issues are?
Having ripped the paper face has put double the work to finish it out.
Start by covering the floor/area with plastic and tape it down with painters tape.
Going to need a corner bead too. Use screws to set it.
Apply little coats at a time{mud}. Lite sands in between coats.
Good lighting is a must.
Should of used full sheets going across and starting at the ceiling.
This post was edited on 7/29/19 at 5:05 pm
Posted on 7/29/19 at 5:06 pm to fishfighter
quote:
Having ripped the paper face has put double the work to finish it out.
First thing I noticed and when he applies that first coat of mud, the brown paper is going to bubble.
Like fishfighter said, go light on the initial and final coats. The more you pile on haphazardly, the more you're going to have to sand off to get a smooth finish.
Posted on 7/29/19 at 7:03 pm to gumbo2176
Thank you all for the constructive feedback. Paper tore somehow when I was sliding them into the bed of my truck. First time doing drywall (obviously).
Posted on 7/30/19 at 7:33 am to jmorr34
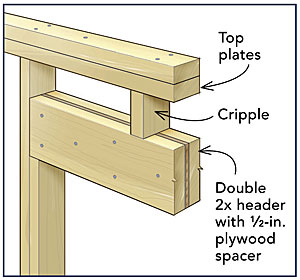
Also on your framing, You need to go back in install a 2x6 header. That flat 2x4 is going to give you trouble. Also were your walls are at, double the studs there too! Would also block pieces of 2x4's about 16" long and then add a full stud at the walls. That will stable things out.
Posted on 7/30/19 at 10:29 am to jmorr34
i would remove the drywall on the door wall and start over. use full size sheets vertically (portrait mode) and put a stud where they meet over the door. if the wall is less than 8 feet wide, have the cut edge at the outside corner of the room. then cut out the doorway. you'll have one 18" seam on that wall, and it will be where two tapers meet. doing the same inside will save a ton of time finishing,
when you cut drywall, cut the face first, break it, then cut the back side. that way, you always have a clean cut on the good side. change your blade often.
if the wall is more than 8 feet tall, have the full sheet high, and fill the gap at the bottom. it's easier to work low that high, and it will be hidden behind stuff.
mud is typically done in 3 stages. (you'll do it more than that). The first stage is to mud the seam, bed tape in it, and remove excess. 2nd stage is build it up. third is a wide layer to blend.
it is much easier to remove lumps and ripples with a trowel when it's wet than by sanding when it's dry. you can get sanding screen if you need to be aggressive and remove lots of material.
if you think you're through, prime it with pva primer, and you'll discover you're not through. you'll be decent at drywall if you stick to it, and then you'll forget and have to learn all over again for the next project.
This post was edited on 7/30/19 at 10:30 am
Posted on 7/30/19 at 10:35 am to piratedude
Another trick, a wet sponge can help with the final coat when it's still a little wet.
Posted on 7/30/19 at 3:50 pm to jmorr34
quote:
Building closet. Drywall question.
It appears you have some pretty questionable wiring there too... there's a reason people drill holes through studs and don't put it on the outer edge of a stud. You'll see when you're trying to put on the base trim.

Posted on 7/30/19 at 5:27 pm to MoarKilometers
A header above door would be nice.
From here this guy has it well described.
Bed your sheetrock tape with as little mud as you can get away with and small knife. If done right you might have to scrape a few high spots but not sand. Proceed with a little wider sheet rock knife and little more mud; hopefully you'll not have to sand this one either. Just scrape the couple high spots down. This is ideally of course. Trick like said is to step up with knife width each time and use as little mud as possible each time. Hot mud (20 minute bag) will allow you to get probably three to fours rounds done in a day. Last coat go a typical standard premixed mud it'll finish out much better.
Outside corner bead like said before; but also use inside corner bead. I prefer the paper with metal on back. It helps you get a really precise/straight inside corner. If lucky you can do both sides of a corner; however if a hassle just do one at a time and don't sweat it... you're still saving money and also likely to end up not having to sand as much.

Posted on 7/30/19 at 6:19 pm to awestruck
quote:
It helps you get a really precise/straight inside corner. If lucky you can do both sides of a corner; however if a hassle just do one at a time and don't sweat it.
They make this inside corner trowel that looks like a spade. Makes inside corners a lot easier to mud.
Posted on 7/30/19 at 10:01 pm to MoarKilometers
quote:
It appears you have some pretty questionable wiring there too... there's a reason people drill holes through studs and don't put it on the outer edge of a stud. You'll see when you're trying to put on the base trim.
It is through the studs.

 Page 1 of 2

Back to top