




 1













- My Forums
- Tiger Rant
- LSU Recruiting
- SEC Rant
- Saints Talk
- Pelicans Talk
- More Sports Board
- Coaching Changes
- Fantasy Sports
- Golf Board
- Soccer Board
- O-T Lounge
- Tech Board
- Home/Garden Board
- Outdoor Board
- Health/Fitness Board
- Movie/TV Board
- Book Board
- Music Board
- Political Talk
- Money Talk
- Fark Board
- Gaming Board
- Travel Board
- Food/Drink Board
- Ticket Exchange
- TD Help Board
Customize My Forums- View All Forums
- Show Left Links
- Topic Sort Options
- Trending Topics
- Recent Topics
- Active Topics
Started By
Message
re: Vader’s Model Desk: MiG-21 “Fishbed”
Posted on 9/13/26 at 8:49 pm to Cheese Grits
Posted on 9/13/26 at 8:49 pm to Cheese Grits
quote:
Vader, do they still make "dual kits"?
Most kits come with multiple variants that you can do. Sometimes, it’s just different decals. For example, this kit came with decals for East Germany, Poland, Czechoslovakia, Iraq, and the Soviet Union. Other kits will come either different parts to use based on which version you choose. For example, I built an Italeri M109 self-propelled howitzer not long ago that had options for about 6-7 countries spanning from US forces in the Vietnam War to current day Spanish Army. There was a wide range of parts that went with some versions, while other parts were for only one single version. I had to follow the instructions closely to do the version I wanted.
I went with the US Army in Vietnam..

Posted on 9/13/26 at 8:59 pm to Darth_Vader
I wish you would pose your models better - the low lighting and background paint soup mess you post is terrible for the eyesight and detracts from the brilliance of your model.
We could see your work much better if the lighting and background wasn’t just soup.
White shelf would be so nice.
Cool Mig
I wished I could see that nose splinter green but yeah lighting disrupts us seeing your true work.
We could see your work much better if the lighting and background wasn’t just soup.
White shelf would be so nice.
Cool Mig
I wished I could see that nose splinter green but yeah lighting disrupts us seeing your true work.
Posted on 9/13/26 at 9:02 pm to Darth_Vader
Awesome stuff. Do you sell any of these?
Posted on 9/13/26 at 9:02 pm to Darth_Vader
Also, 48 scale have gigantic canopies and subsequent cockpits.
Any photos of the canopy masking or interior cockpit details?
Any photos of the canopy masking or interior cockpit details?
Posted on 9/13/26 at 9:07 pm to Darth_Vader
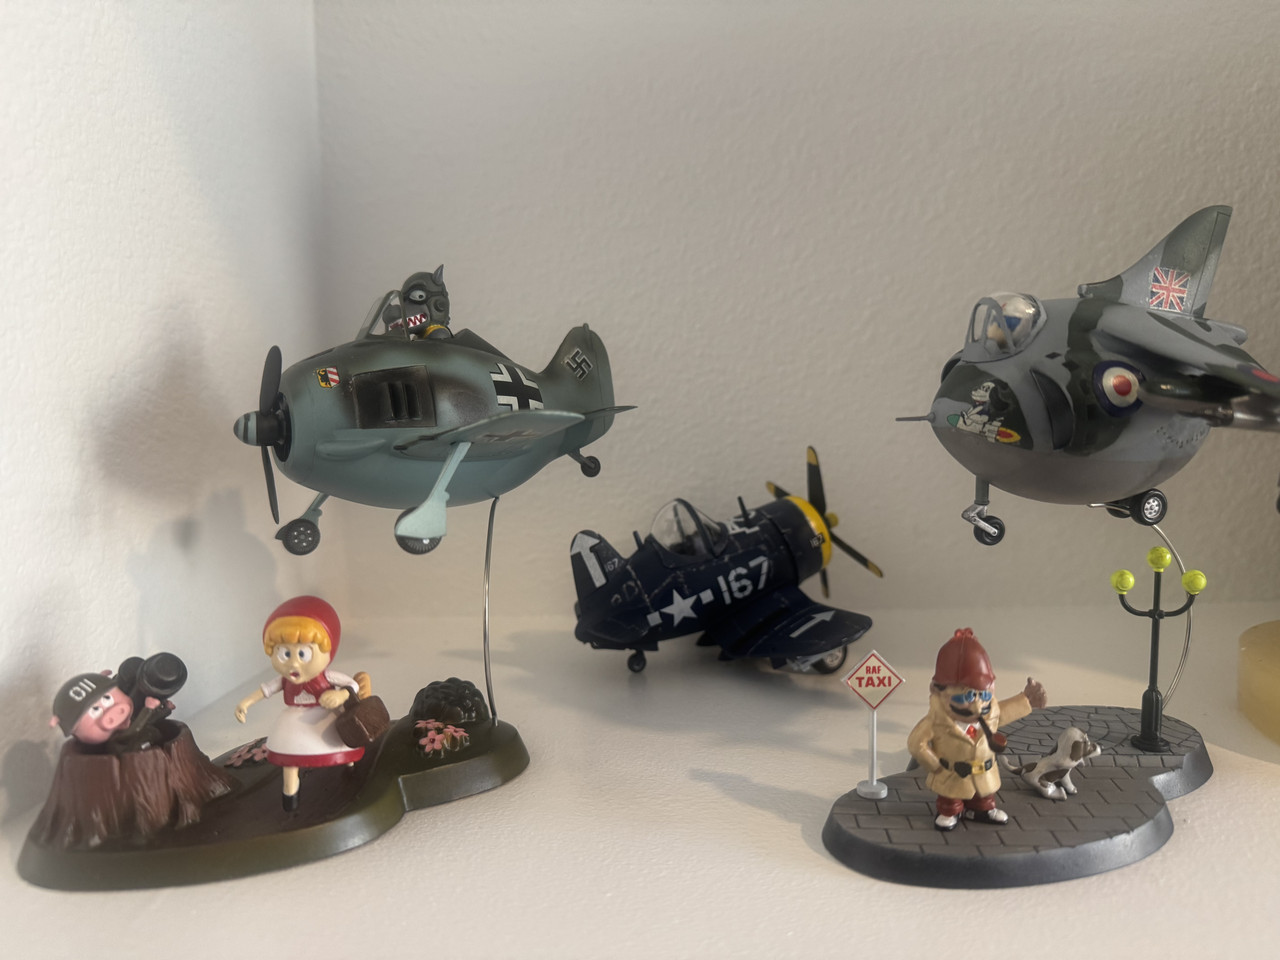
quote:
White shelf would be so nice.
Like this:
Posted on 9/13/26 at 9:34 pm to Darth_Vader
quote:
“Fishbed” was a NATO designation. Soviet aircraft were given names starting with the letter F, bombers got names stating either the letter B.
For example, the MiG-15 fighter was given the designation “Fagot” (not that there’s anything wrong with that) while the TU-95 bomber was given the designation “Bear” by NATO.
Besides the F for fighter and B for bomber, NATO also used the number of syllables in the naming convention. Jet-powered planes were always two syllables eg Flanker, and one syllable for prop planes like the TU-95 Bear with its turbofans.
Great work as always BTW.
Posted on 9/13/26 at 9:41 pm to Darth_Vader
Darth, as always, awesome work!!
I need some advice. I’m just getting back into putting these bad boys together. I used to do it back when I was younger and had gotten pretty good at it. Well, I’m stuck in the hospital for the foreseeable future and my father-in-law sent me an F-18 Super Hornet to work on and help kill the time..
Do you have any advice on how to do any basic weathering/ smoke trails with just hand painting? All I can really do is just dip the brush, get most of the paint off, then do some small trails or “weathering” Obviously, I’m not airbrushing anything in here and to be honest, I’ve never used an airbrush before. I’m kind of limited on colors as well. I’ve had to mix some to get what I want, but it’s tough.
Any advice would be welcomed!
I need some advice. I’m just getting back into putting these bad boys together. I used to do it back when I was younger and had gotten pretty good at it. Well, I’m stuck in the hospital for the foreseeable future and my father-in-law sent me an F-18 Super Hornet to work on and help kill the time..
Do you have any advice on how to do any basic weathering/ smoke trails with just hand painting? All I can really do is just dip the brush, get most of the paint off, then do some small trails or “weathering” Obviously, I’m not airbrushing anything in here and to be honest, I’ve never used an airbrush before. I’m kind of limited on colors as well. I’ve had to mix some to get what I want, but it’s tough.
Any advice would be welcomed!
Posted on 9/13/26 at 9:47 pm to Darth_Vader
Nice.
The Chennault Aviation and Military Museum has a real MIG 15.
The Chennault Aviation and Military Museum has a real MIG 15.
Posted on 9/14/26 at 5:35 am to Darth_Vader
Yes
F nicknames for Fighter
B nicknames for Bombers (my favorite was Badger and wished one had Beaver designation - for Ward's mom)

Posted on 9/14/26 at 7:23 am to One72
quote:
I wished I could see that nose splinter green but yeah lighting disrupts us seeing your true work.
I’ve thought about getting a white box for this purpose. May do so soon.
Posted on 9/14/26 at 7:24 am to RLDSC FAN
quote:
Awesome stuff. Do you sell any of these?
I’ve done a few on commission over the years. One for someone here in fact. But in general they go one my shelves.
Posted on 9/14/26 at 7:33 am to One72
quote:
Any photos of the canopy masking or interior cockpit details?


Posted on 9/14/26 at 7:36 am to Darth_Vader
quote:
Wittstock, GDR
GDR is East Germany for all you young 'uns.

Posted on 9/14/26 at 7:56 am to im4LSU
quote:
Darth, as always, awesome work!!
Thanks!
quote:
need some advice. I’m just getting back into putting these bad boys together. I used to do it back when I was younger and had gotten pretty good at it. Well, I’m stuck in the hospital for the foreseeable future and my father-in-law sent me an F-18 Super Hornet to work on and help kill the time..
I hope everything is ok.
quote:
Do you have any advice on how to do any basic weathering/ smoke trails with just hand painting? All I can really do is just dip the brush, get most of the paint off, then do some small trails or “weathering” Obviously, I’m not airbrushing anything in here and to be honest, I’ve never used an airbrush before. I’m kind of limited on colors as well. I’ve had to mix some to get what I want, but it’s tough.
Something super simple you could do for weathering is an oil wash. Here is a step-by-step.
1. Paint the model with flat acrylic paints in whatever scheme/camo pattern you want it to have when done.
2. Go over the model with a gloss acrylic clear coat. Wait at least 30 min before moving to the next step.
3. Apply your decals. I recommend using a setting agent. I use Tamiya Mark Fit Strong.
4. Go over the model with a flat acrylic clear coat.
5. Brush on a black enamel oil wash. I personally use Tamiya Black Panel Accent that I’ve further thinned with Testors Enamel Thinner. Allow this to dry for about 15/30 minutes.
6. Using a-tips or a paper towel soaked in Enamel thinner, remove the excess oil wash. Be careful to not bear down too much in order to not damage the actual paint job on the model.
The finished product will be like what you see in my OP.
The key to all of this is to use acrylic paints, including the clear coats I mentioned and wash in an enamel based wash and use an enamel thinner on cleanup. That way it won’t harm the acrylic paints you’ve used. You’d flat clear coat will offer good protection, but you can still damage it if you scrub too hard.
Sandwiching your decals with gloss clear coat under and flat clear coat over, will both protect the decals and paint and reduce any shine. The result will look something like this…

Also, since you’re brush painting, I’d recommend thinning your paints. I personal use Tamiya Flat Acrylics and thin with Tamia Acrylic Thinner. Thin your paints to a ratio of 2:1 paint to thinner. Don’t try to cover the kit in one thick coat. Instead use thin, even coats.
Good luck. Once you’re done I’d love to see the finished product.
Posted on 9/14/26 at 8:46 am to Darth_Vader
How'd you do the weathering?
As always
As always
Posted on 9/14/26 at 9:23 am to HeadSlash
quote:
How'd you do the weathering? As always
Thanks!
In this particular model, my weathering process was the oil wash I described in the post right before yours. On others I’ll also chipping effects by dabbing the desired color using a tiny bit of sponge. Here are two examples of chipping:


On some armor models, one thing I like to do is make a well worn winter whitewash camouflage effect. It was common for tank crews to apply a whitewash on their vehicles at the start of winter. But the paints they used were temporary and would wear out over a matter for a couple of months. I do this effect. by first painting the model a base white then dab the regular vehicle color to give it a well worn look. Here’s an example:

Posted on 9/14/26 at 11:45 am to Darth_Vader
Dude you did it again! How did you get the weathered NMF look? Paints?
Posted on 9/14/26 at 2:06 pm to HeadSlash
quote:
How'd you do the weathering?
He does an awesome job!
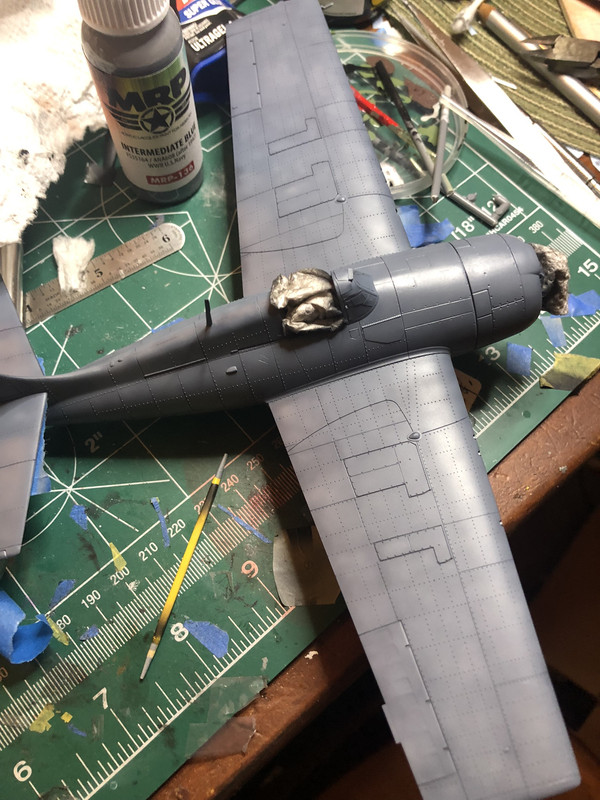
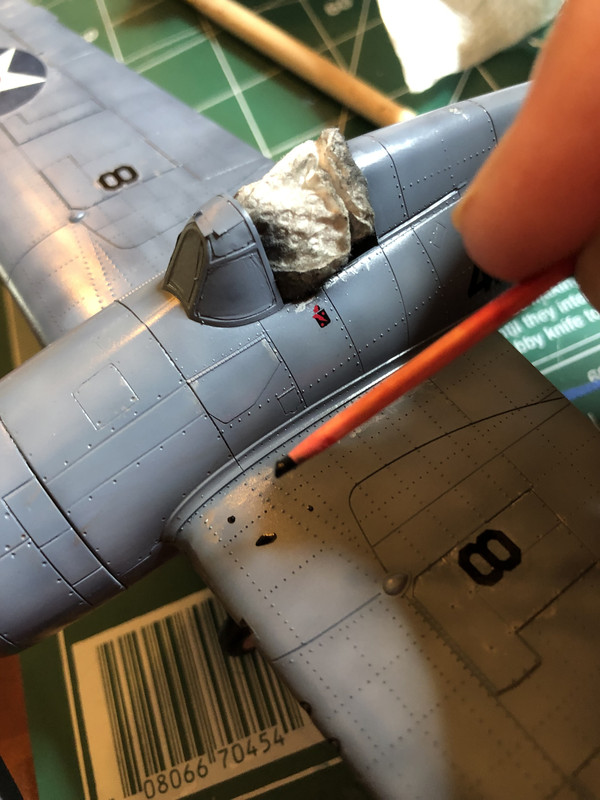
I use the black basing method, as shown below:

black basing highlights:

Which creates tonal patterns:
Then oils:
Then airbrush stuff like exhaust staining:

Also so some chipping like Darth does, but he is the master at it!
Posted on 9/14/26 at 2:49 pm to Spaceman Spiff
Thanks. Your weathering on that Hellcat is fantastic. I’ve never tied the method you described. I may have to play around with it soon.
Is this Hellcat what you’re working on now?
Also, don’t you live in Georgia? If so, how close to you to Kennesaw?
Is this Hellcat what you’re working on now?
Also, don’t you live in Georgia? If so, how close to you to Kennesaw?
Posted on 9/14/26 at 4:30 pm to Darth_Vader
I'm curious, where do you put all of these? What does your display look like?

 Page 2 of 4



Popular
Back to top
 Follow TigerDroppings for LSU Football News