- My Forums
- Tiger Rant
- LSU Recruiting
- SEC Rant
- Saints Talk
- Pelicans Talk
- More Sports Board
- Fantasy Sports
- Golf Board
- Soccer Board
- O-T Lounge
- Tech Board
- Home/Garden Board
- Outdoor Board
- Health/Fitness Board
- Movie/TV Board
- Book Board
- Music Board
- Political Talk
- Money Talk
- Fark Board
- Gaming Board
- Travel Board
- Food/Drink Board
- Ticket Exchange
- TD Help Board
Customize My Forums- View All Forums
- Show Left Links
- Topic Sort Options
- Trending Topics
- Recent Topics
- Active Topics
Started By
Message
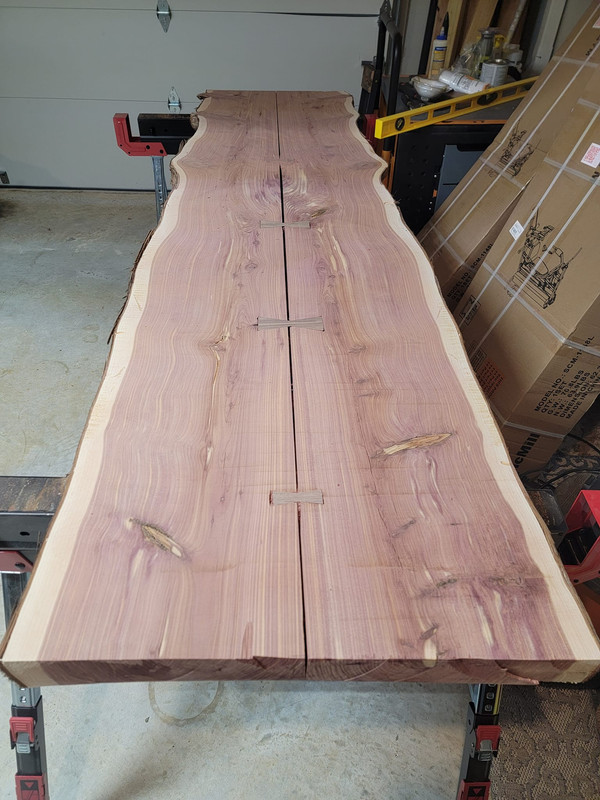
Will be epoxying this bar top soon. Any tips?
Posted on 2/6/24 at 10:53 am
Posted on 2/6/24 at 10:53 am
Using total boat for a few seal coats, then a flood coat.
Its not done yet, I'm going to fill that gap in the middle and finish sanding it.
Its not done yet, I'm going to fill that gap in the middle and finish sanding it.
 8
8

Posted on 2/6/24 at 11:09 am to LordSnow
put some plastic sheets below to make cleanup easy. have a heat gun of some sort ready for bubbles. Hopefully those sides will get coated with them being angled back.
Follow the instructions for your epoxy to the letter.
Follow the instructions for your epoxy to the letter.
Posted on 2/6/24 at 1:09 pm to LordSnow
Clean up the bow ties if you can.

Posted on 2/6/24 at 2:32 pm to LordSnow
Clean up the live edges, loose bark is a no-no for epoxy as, contrary to belief, the epoxy will not hold that stuff in place. Really don't want any bark on the live edge if you plan to really use that bar top.
Posted on 2/6/24 at 3:27 pm to LordSnow
Look up Blacktail Studio on YouTube. Makes great looking tables with epoxy. I'm sure you can get a ton of tips before doing anything that will set you back.
Posted on 2/6/24 at 3:30 pm to BlackPot
quote:
Look up Blacktail Studio on YouTube.
He sells an epoxy training class if you really want to dive deep into it. Him and John malecki on youtube have done a ton of epoxy stuff and made a lot of mistakes people can learn from
Posted on 2/6/24 at 4:28 pm to LordSnow
I second the heat gun. I built a custom ice chest for my boat and didn’t understand why it was forming bubbles. Only after that did I read about the heat gun.

Posted on 2/6/24 at 8:16 pm to LordSnow
That is a beautiful top. Please post pics after.
Thinking about doing a similar project with some TV trays.
More of a project for the wife and I but I have never done it so Im looking forward to it
Thinking about doing a similar project with some TV trays.
More of a project for the wife and I but I have never done it so Im looking forward to it

Posted on 2/6/24 at 8:49 pm to LordSnow
Did you buy the slab or you have a portable sawmill?
Posted on 2/7/24 at 6:11 am to Jack Daniel
quote:
Did you buy the slab or you have a portable sawmill?
I assumed he bought it and it came in those two big boxes in the picture.
Posted on 2/7/24 at 6:15 am to turkish
quote:
Clean up the bow ties if you can.
Even if it's just putting some wood glue in the cracks and sanding to make a natural wood-glue/sawdust wood filler. Use Titebond original so it's not dark drying like titebond.

Posted on 2/7/24 at 7:30 am to LordSnow
Beautiful wood but why is there such a large gap at the main joint? You need to straight line that joint and get a tight fit.
Posted on 2/7/24 at 8:58 am to Jack Daniel
quote:
Did you buy the slab or you have a portable sawmill?
I drove up to a saw mill in Killeen and watched them saw them. $85.00

Posted on 2/7/24 at 9:00 am to jmon
Agree, a joiner would fix that center line. That would bug me if just filled with something that wouldn’t match too well.
Otherwise, a great looking slab that will pop once the clear finish is applied!
Otherwise, a great looking slab that will pop once the clear finish is applied!
Posted on 2/7/24 at 9:01 am to Jon A thon
quote:
Even if it's just putting some wood glue in the cracks and sanding to make a natural wood-glue/sawdust wood filler
Yeah, I made the mistake of hand chiseling those in. AND I put them in before I was done surfacing them thinking the router would just plane them smooth. It caused tear out.
So I am adding a couple larger bowties in the bad ones and I'll router out the majority and chisel the edges. 100% using glue and sawdust to fill gaps etc.
Posted on 2/7/24 at 9:26 am to jmon
quote:
Beautiful wood but why is there such a large gap at the main joint? You need to straight line that joint and get a tight fit.
It's a style. Especially with the bowties. More of a natural edge look.
Posted on 2/7/24 at 10:00 am to Jon A thon
Natural edge =/= poor joinery. And I’m not saying I could do better.
This post was edited on 2/7/24 at 10:01 am
Posted on 2/7/24 at 10:15 am to turkish
quote:
Natural edge =/= poor joinery
Again, and I'm not arguing if it looks good or not, if you are intending to leave the "rough" gap between the two slabs, then it's not "poor joinery". It's intended to be that way. And lots of people want to utilize the bowties as an aesthetic feature. It would be dumb to perfectly joint both edges and glue them up, then use bowties. Since the bowties would be doing nothing. But leaving the gap as a "crack" like feature along with the bowties makes it look like a natural, damaged piece of wood you saved for a visually interesting table with your woodworking skills. It's very much a style.
Posted on 2/7/24 at 10:21 am to Jon A thon
I didn’t realize you wanted it to look like a natural crack, between book-matched pieces.
Posted on 2/7/24 at 10:31 am to Jon A thon
quote:
f you are intending to leave the "rough" gap between the two slabs, then it's not "poor joinery". It's intended to be that way. And lots of people want to utilize the bowties as an aesthetic feature.
There is so much wrong in this post. You do not use bowtie fasteners to join what you want to be "rough edges". They are meant to join a finished straight edge to another. What he has there will not look good in the end.
To each his own.

 Page 1 of 2

Popular
Back to top