- My Forums
- Tiger Rant
- LSU Recruiting
- SEC Rant
- Saints Talk
- Pelicans Talk
- More Sports Board
- Fantasy Sports
- Golf Board
- Soccer Board
- O-T Lounge
- Tech Board
- Home/Garden Board
- Outdoor Board
- Health/Fitness Board
- Movie/TV Board
- Book Board
- Music Board
- Political Talk
- Money Talk
- Fark Board
- Gaming Board
- Travel Board
- Food/Drink Board
- Ticket Exchange
- TD Help Board
Customize My Forums- View All Forums
- Show Left Links
- Topic Sort Options
- Trending Topics
- Recent Topics
- Active Topics
Started By
Message
re: 35’6” Razorhead Cat Build
Posted on 12/31/21 at 4:26 pm to reds on reds on reds
Posted on 12/31/21 at 4:26 pm to reds on reds on reds
Worked with yall on a ferry
 1
1

Posted on 12/31/21 at 5:17 pm to maisweh
Who do you work for?
Posted on 12/31/21 at 6:23 pm to reds on reds on reds
I was at gulf island
Posted on 12/31/21 at 6:57 pm to maisweh
Are you at Bollinger now?
Posted on 12/31/21 at 7:19 pm to maisweh
Maisweh we probably know each other as well. Nav arch is a small community.
Posted on 12/31/21 at 11:05 pm to reds on reds on reds
Yes I am. Best thing that ever happened to that company was the buy out
Posted on 1/1/22 at 1:04 am to Timmayy
Heck yeah, that will do it. Experiment with the hardener and acetone. Use the biggest tip the compressor will handle let it sit for a few minutes and can respray over and over laying it thick as long as it is still tacky. When u are about done load up last coat with extra hardener. At least that's how I did it.
Good thing is you don't have to sand nearly as much to get it to start shining. But still have to sand it's just not as much and I felt was much much more even.
Edit:
I'm an idiot I didn't even tell you most important part I'm sry hope your small job went well.
But that final coat when I put a bit more hardener in the last cup that's when I added wax. So need a waxless gelcoat and very last coat when u put a extra few drop or two in the cup add your wax and then spray that last coat B4 you close up shop for that piece for the day. And wet sand the next day
This post was edited on 1/1/22 at 1:32 am
Posted on 1/1/22 at 4:52 pm to maisweh
Are you in the metairie office?
I was at Bollinger for 3 years before I moved.
I was at Bollinger for 3 years before I moved.
Posted on 1/3/22 at 12:10 pm to reds on reds on reds
Yep. Not a nav arc though.
Posted on 3/10/22 at 8:54 am to maisweh
Little bump and picture dump. Got the tackle trays that are going into the seats fabbed up. Made a template and tested to see fit with some MDF before moving to full size aluminum trays. There is starboard going on the top and bottom to give a tight fit and provide some friction to lock the boxes in place. Each side will hold 4 regular depth and 3 deep tackle trays.


This post was edited on 3/10/22 at 8:58 am
Posted on 3/10/22 at 9:23 am to maisweh
Lurking this conversation im pretty sure I know all of yall
Posted on 3/10/22 at 11:56 am to DownshiftAndFloorIt
Who dis
Posted on 3/10/22 at 3:11 pm to reds on reds on reds
Looks awesome. Just curious, why not go with starboard tackle drawers from boat outfitters
Posted on 3/10/22 at 3:21 pm to maisweh
Your initials JD?
Posted on 3/10/22 at 5:15 pm to CP3
I’ve argued with him about this 1000 times, or even better use that multi thousand dollar cnc he has to crank them out and sell.
But noooo he thinks they are hideous
Also plans to flush mount into the side of the seats
But noooo he thinks they are hideous
Also plans to flush mount into the side of the seats
This post was edited on 3/10/22 at 5:16 pm
Posted on 3/15/22 at 9:47 pm to Timmayy
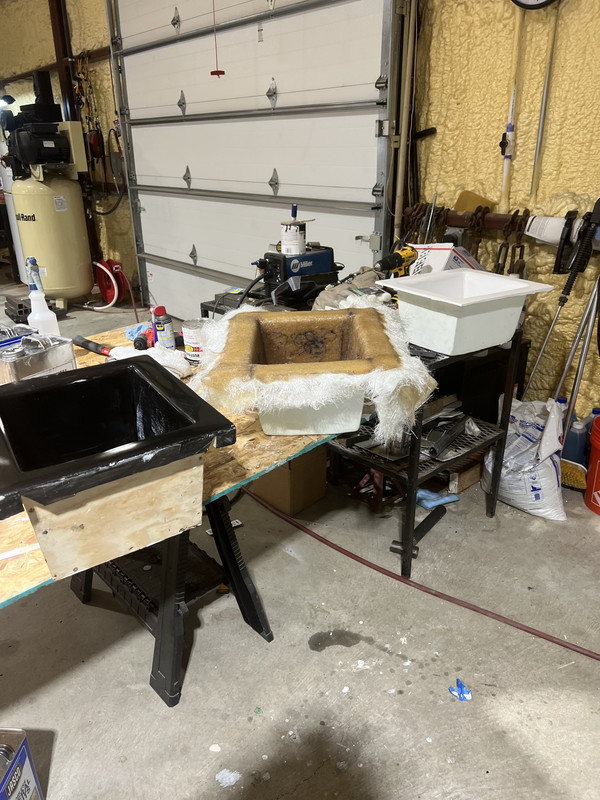
Been working on the seachests and livewell plumbing this week. Got the port seachest entirely complete minus the acrylic top and the starboard seachest out of the mold needing interior fair and gelcoat.
Livewell plumbing has all drains and fills cut and dry fit.
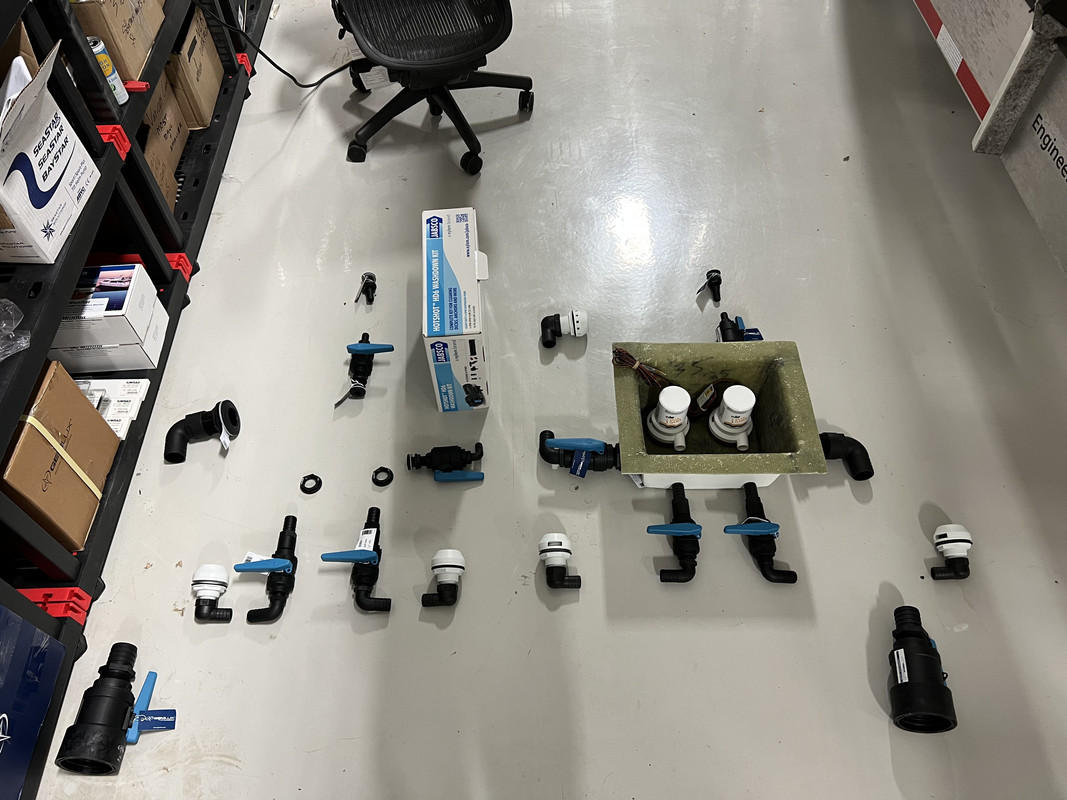
The boat will have a starboard and port seachest with 2 1500 rules in each.
Port seachest will feed port 40 gal livewell and main 100 gal livewell. There is also a selerate drain in the main livewell that ties back into a valve on the port seachest that allows to recirculate the water on the main and port livewell by opening the valve in the seachest tied to that drain and closing the main port 2” pickup. Shout out to CP3 for hooking me up with an aluminum 2”npt x nps threaded nipple for the thruhulls.
Note that all thruhulls fittings and valves are truedesign composite fittings. These valves are rated for a 500lb force applied to the end of the valve when mounted in their composite thruhull with load collars. We went with these for two reasons. One it solved our problem of the dissimilar metals on aluminum and two the valves should never corrode into any one position.
The starboard seachest will feed starboard small livewell as well as main livewell. In place of the recirc valve the starbiard seachest will feed the wash down pump.
Next thing to attach is fabricating a shelf for the seachest to sit on and then moving to insulating coffin boxes, fish bixes, and inseat ice chests.
Pics of progress below.
Port box out of mold (you should have heard me yell when it popped loose)
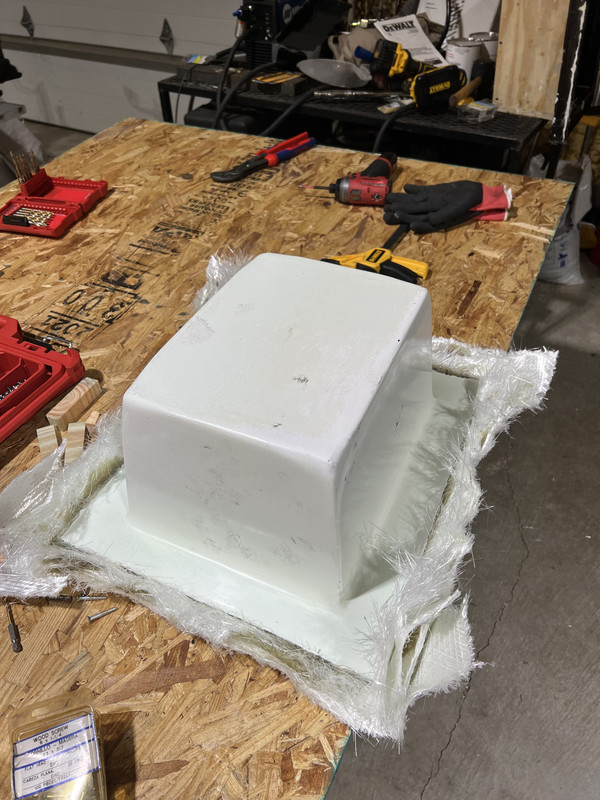
Port box trimmed up
Plumbing layout (imagine the starboard box)
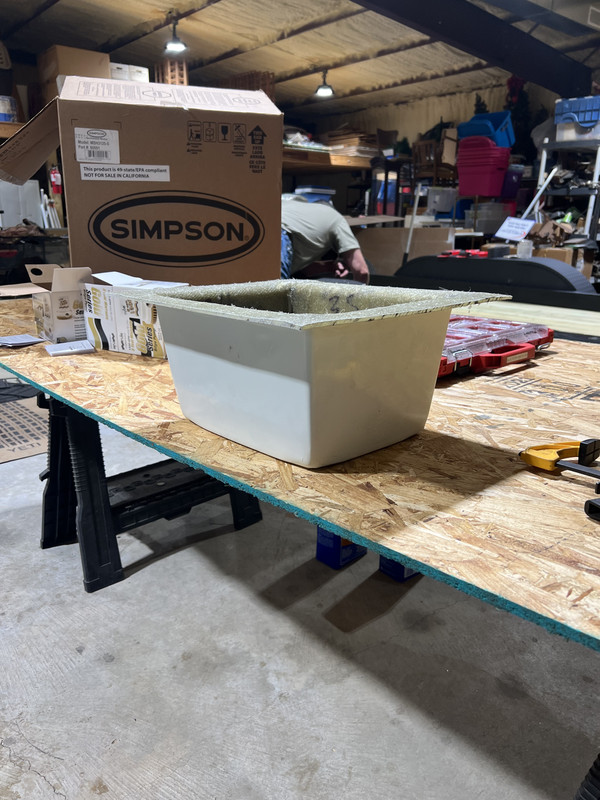
Starboard box out of mold mold paying off
Port box plumbing. Don’t judge the inside gelcoat finish. I just didn’t think it necessary tj spend a bunch of time applying coats of gel and sanding ti perfect finish to be boxed up.
Port box done (will post when acrylic top is bolted up)

Livewell plumbing has all drains and fills cut and dry fit.
The boat will have a starboard and port seachest with 2 1500 rules in each.
Port seachest will feed port 40 gal livewell and main 100 gal livewell. There is also a selerate drain in the main livewell that ties back into a valve on the port seachest that allows to recirculate the water on the main and port livewell by opening the valve in the seachest tied to that drain and closing the main port 2” pickup. Shout out to CP3 for hooking me up with an aluminum 2”npt x nps threaded nipple for the thruhulls.
Note that all thruhulls fittings and valves are truedesign composite fittings. These valves are rated for a 500lb force applied to the end of the valve when mounted in their composite thruhull with load collars. We went with these for two reasons. One it solved our problem of the dissimilar metals on aluminum and two the valves should never corrode into any one position.
The starboard seachest will feed starboard small livewell as well as main livewell. In place of the recirc valve the starbiard seachest will feed the wash down pump.
Next thing to attach is fabricating a shelf for the seachest to sit on and then moving to insulating coffin boxes, fish bixes, and inseat ice chests.
Pics of progress below.
Port box out of mold (you should have heard me yell when it popped loose)
Port box trimmed up
Plumbing layout (imagine the starboard box)
Starboard box out of mold mold paying off
Port box plumbing. Don’t judge the inside gelcoat finish. I just didn’t think it necessary tj spend a bunch of time applying coats of gel and sanding ti perfect finish to be boxed up.
Port box done (will post when acrylic top is bolted up)
This post was edited on 3/19/22 at 12:30 pm
Posted on 3/15/22 at 10:43 pm to reds on reds on reds
Looking good! Do you like the aluminum more then the starboard for looks or bc it's thinner and lighter?
I would think you will need to sand everything down well and maybe add double sheets or ad something extra for the top and sides to not get cut or stabbed in a rocking boat when your all soggy and cut easy
I would think you will need to sand everything down well and maybe add double sheets or ad something extra for the top and sides to not get cut or stabbed in a rocking boat when your all soggy and cut easy
Posted on 3/15/22 at 10:45 pm to Timmayy
Holy crap those boxes look good. How tdid the spray gelcoat work for you? A little simpler to apply and sand even if a bit more messy?
Posted on 3/15/22 at 11:22 pm to Lsutigerturner
My buddy likes it more for looks. He thinks the starboard ones are ugly (idk I’ve argued with him about it for longer than I should.
He also like the idea of being able to weld these in to be flush mount.
Everything will be sanded to a round smooth edge ti avoid slicing
He also like the idea of being able to weld these in to be flush mount.
Everything will be sanded to a round smooth edge ti avoid slicing
Posted on 3/15/22 at 11:24 pm to Lsutigerturner
Unfortunately because I finished the boxes in Louisiana and not at my house in Houston I didn’t get to try my spray rig out.
But I found that using a 3” foam brush And thinning the gelcoat about 10% with styrene I was able tj get wayyyy better results than before (but I imagine had I sprayed it would have been siginfifantmy better)
But I found that using a 3” foam brush And thinning the gelcoat about 10% with styrene I was able tj get wayyyy better results than before (but I imagine had I sprayed it would have been siginfifantmy better)

 Page 6 of 9

Popular
Back to top