- My Forums
- Tiger Rant
- LSU Recruiting
- SEC Rant
- Saints Talk
- Pelicans Talk
- More Sports Board
- Fantasy Sports
- Golf Board
- Soccer Board
- O-T Lounge
- Tech Board
- Home/Garden Board
- Outdoor Board
- Health/Fitness Board
- Movie/TV Board
- Book Board
- Music Board
- Political Talk
- Money Talk
- Fark Board
- Gaming Board
- Travel Board
- Food/Drink Board
- Ticket Exchange
- TD Help Board
Customize My Forums- View All Forums
- Show Left Links
- Topic Sort Options
- Trending Topics
- Recent Topics
- Active Topics
Started By
Message
re: Post your Woodworking Projects
Posted on 5/2/19 at 10:55 am to BRgetthenet

Posted on 5/2/19 at 10:55 am to BRgetthenet
quote:
Then, a decent router. Might buy a cheap router to practice with and move up in class over time.
My recommendation would be to get the interchangeable one (plunge and fixed) similar to this

It's a PITA to have to keep adjusting on the fly. This will be my next purchase I think.
 1
1

Posted on 5/2/19 at 12:24 pm to the mighty weez
The darker squares are actually cedar 4x4 post the I cut to size and used the end grain.
Cedar endgrain always tends to turn dark when I use walrus or Odie’s oil. It came out nice and dark. Complimented the board well.
That board was a royal pain.
Cedar endgrain always tends to turn dark when I use walrus or Odie’s oil. It came out nice and dark. Complimented the board well.
That board was a royal pain.

Posted on 5/2/19 at 12:26 pm to idlewatcher
I'm building a workshop for myself. Will post images of the entire process once it's up, but since I travel nationally for business so much it's a slow process for me. Once I have this, I'm hoping to do more woodworking. I built this some years back. My first piece of furniture, which was a coffee table, with a leather insert top. It's sort of scratched up and needs some love, but it was purpose built for my previous house and has a 3-tube CRT video projector built-in. I can slide the top back, and pull up a panel to reveal the projected lights, and then slide the panel back and put the front cover back in place so that the projector is hidden. I had the cables and electrical in the floor and this was bolted down to the floor to keep it stable and in one place. My mantle had a built-in video screen that was actuated by the projector turning on and would lower down from under the mantle.
Don't use this anymore. Still works great. It'd make a great boat anchor if anyone is interested.


Don't use this anymore. Still works great. It'd make a great boat anchor if anyone is interested.
Posted on 5/2/19 at 12:39 pm to idlewatcher
I am far from a master woodworker.
I know that most wouldn’t believe, but I picked up woodworking about one full year ago. I have been around it as my father, grand and great grandfather were all master and accomplished wood carvers.
It started as a simple project my wife asked for and I was sick and damn tired of her asking my father in-law for the help.
It turned into a quick whirlwind of passion for woodwork.
Every piece I post has been done within the past year.
One year ago I owned zero. ZERO tools. I now have a full blown workshop minus a couple of specialty tools. I have 1-2 commissioned pieces that stay on my book and I find time for quirky little pieces like the LSU board.
As for the T and L not bleeding. It is all about your prep. You have to have a plan. Have a specific task each time you grab a tool. No winging it. Write things down in a notebook or on your bench top.
For that specific project I put down my LSU logo onto the wood of choice with sticky paper. I then trimmed it with an exacto knife. I routed out the LSU portion and poured its epoxy; leaving the “tigers” behind. I then exacto cut around the tigers portion. — a good tip for inlays to work is to use a chisel or knife to cut your edges. This will cause your router to give you a small “notice” when you get to that cut mark. It essentially is a feeling of ease or relief and you then know your at your edge. I always finish my routes edges with chisels. Never sand. Sanding will produce a rounded edge. You want a strict sharp flat edge.
Back to the piece, I routed the Tigers and went very slow. If your router has speed settings 1-6 let’s say.. use 2-3. Have a steady hand and route until you see no wood and all epoxy where the LSU and tigers will meet. Once done simply pour again into the tigers and your done.
Remember, cleanliness while pouring isn’t imperative if you put good proper hard cut chisled edges. When you sand it down afterwards it’ll sand to where that fine popped line is and give you the finish you see in the photo.
This post was edited on 5/2/19 at 12:45 pm
Posted on 5/2/19 at 2:56 pm to TIGERBAIT84
You read my mind about the photos, was just about to ask if you had any.
Appreciate the explanation of how you went about it. Makes sense when you can see it layed out step by step.
This is referring to pre-Routing yea? As in after you've cut out the template.
Appreciate the explanation of how you went about it. Makes sense when you can see it layed out step by step.
quote:
a good tip for inlays to work is to use a chisel or knife to cut your edges
This is referring to pre-Routing yea? As in after you've cut out the template.
Posted on 5/2/19 at 8:45 pm to idlewatcher
Finished up these and put the first coat of oil on them.
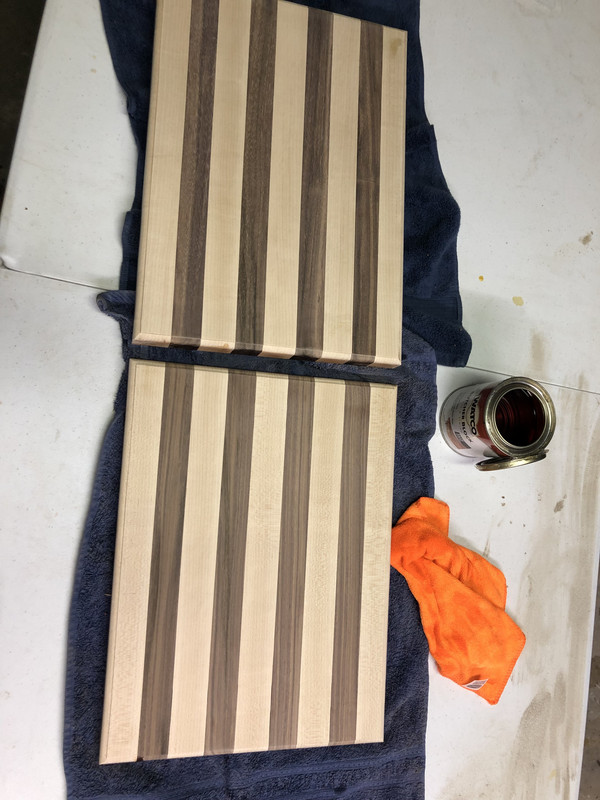
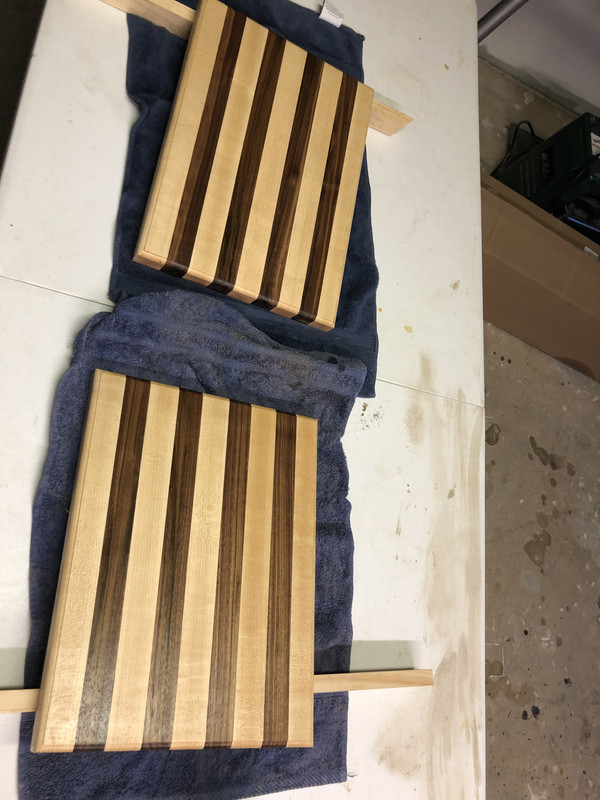
I want to do some more unique patterns soon, but I’m about out of hardwoods. Guess another trip to brazos will happen soon
I want to do some more unique patterns soon, but I’m about out of hardwoods. Guess another trip to brazos will happen soon
This post was edited on 5/2/19 at 8:47 pm
Posted on 5/2/19 at 9:25 pm to Glock17
Looking good.
You guys buying hardwoods in the BR area, how does the selection/price at Brazos compare to Service Lumber? Service is the only hardwood supplier I've been to, still pretty new to buying wood outside of Lowe's and Stine. Last I went, I picked up some good looking walnut for just under $8/BF.
You guys buying hardwoods in the BR area, how does the selection/price at Brazos compare to Service Lumber? Service is the only hardwood supplier I've been to, still pretty new to buying wood outside of Lowe's and Stine. Last I went, I picked up some good looking walnut for just under $8/BF.
Posted on 5/2/19 at 9:28 pm to the mighty weez
I’m still new to it as well... I’ve only made 1 trip to brazos. The guys over there that helped me out were nice enough. I live about 5 minutes from brazos so it’s hard to me to go elsewhere
Posted on 5/2/19 at 10:15 pm to idlewatcher
Correct. Prior to touching with the router make yourself a bit of an edge with a chisel or exacto. You’ll notice immediately how much it helps.
Posted on 5/2/19 at 10:16 pm to the mighty weez
Brazos is far and beyond better than any other local provider I can find.
Posted on 5/3/19 at 4:42 am to TIGERBAIT84
I'm about to make my first trip over to Brazos, is it easy to browse or do you have to know what you want before you walk in?
Posted on 5/3/19 at 7:34 am to TomSpanks
quote:
I'm about to make my first trip over to Brazos, is it easy to browse or do you have to know what you want before you walk in?
It's just a huge warehouse. When I've gone, I've told the salesman what I was looking for, and they'd walk me back to the warehouse where the type of wood was located and help me pick out what I wanted.
Posted on 5/3/19 at 7:52 am to Drunken Crawfish
Cedar table I did:


Posted on 5/3/19 at 11:42 am to LSU alum wannabe
If you've got $90 to burn on a new cartridge.
Posted on 5/3/19 at 12:21 pm to Drunken Crawfish
(no message)
This post was edited on 5/3/19 at 12:23 pm
Posted on 5/3/19 at 12:59 pm to TomSpanks
Just ask for Melvin or Billy. They will give you a tour.
Posted on 5/3/19 at 5:28 pm to TigerSprings
quote:
you've got $90 to burn on a new cartridge.
Thanks. I wondered how much the “fix” was.
Also, that’s a lot of torque. Does it damage other components? Hell even twist the theframe of the Table?
Posted on 5/3/19 at 6:58 pm to LSU alum wannabe
No it doesn’t at all! The cartridge is aluminum, it doesn’t damage the blade at all. I tripped mine by adjusting the miter gauge to 5 degrees. It worked perfectly. No damage to blade or miter gauge.
Posted on 5/5/19 at 10:17 pm to TigerSprings


I didn’t have much time in the shop today, but I was able to work in a hippy style beer tote.
Posted on 5/6/19 at 10:31 am to TIGERBAIT84

I finished up this toy chest/blanket over the weekend. It’s 3/4” maple plywood. I am trying to figure out a good finish to put on it. I want to keep the natural wood look, maybe just deepen the grain pattern and protect it.
Any recommendations?

 Page 6 of 17

Back to top