- My Forums
- Tiger Rant
- LSU Recruiting
- SEC Rant
- Saints Talk
- Pelicans Talk
- More Sports Board
- Fantasy Sports
- Golf Board
- Soccer Board
- O-T Lounge
- Tech Board
- Home/Garden Board
- Outdoor Board
- Health/Fitness Board
- Movie/TV Board
- Book Board
- Music Board
- Political Talk
- Money Talk
- Fark Board
- Gaming Board
- Travel Board
- Food/Drink Board
- Ticket Exchange
- TD Help Board
Customize My Forums- View All Forums
- Show Left Links
- Topic Sort Options
- Trending Topics
- Recent Topics
- Active Topics
Started By
Message
 1
1

Posted on 6/26/25 at 7:22 am to 9rocket
quote:
Might I suggest a light orange peel texture before priming ?
I beleive that would match the rest of the house so not opposed.
How do I apply that?
Posted on 6/26/25 at 9:36 am to jlovel7
orange peel texture is a spray on application it comes in spray cans. Way easier than drywall mud LOL
Posted on 6/26/25 at 11:30 am to jlovel7
Cans are good for small areas or patches. A whole wall or two would get expensive.
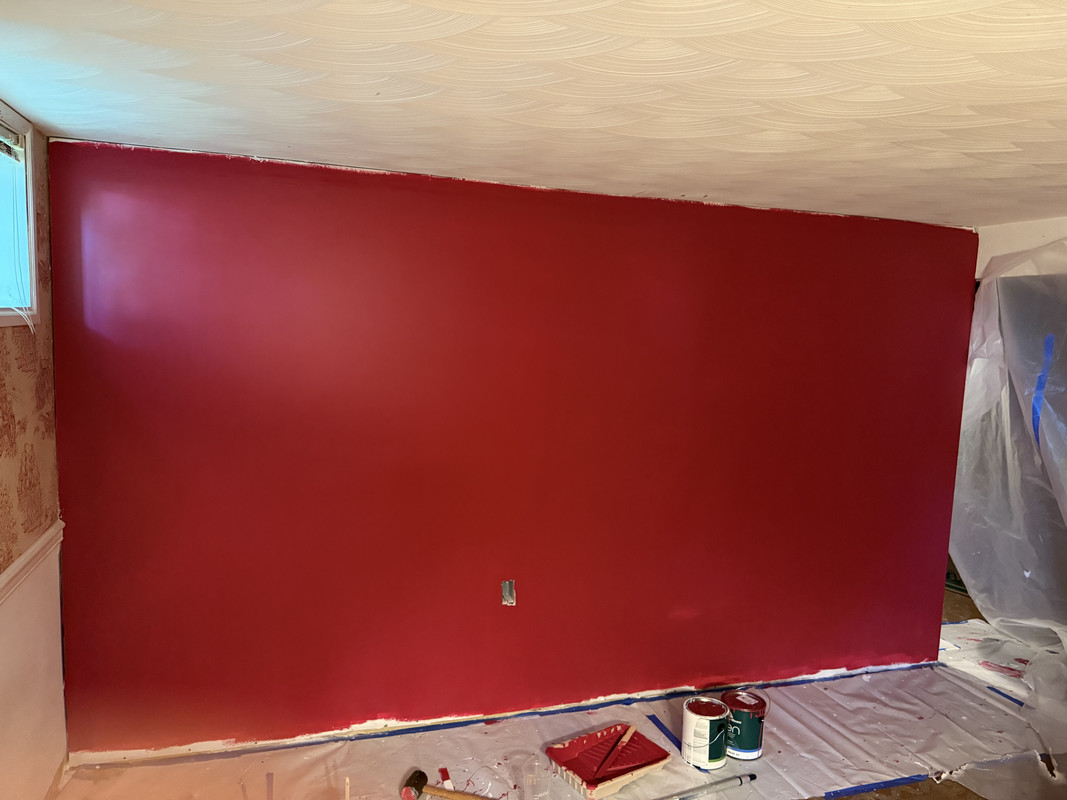
Use drywall mud mixed very, very loose. I prefer the green lid as it is stronger than the blue. You will need a hopper and an air compressor. Hopper comes with three nozzles, use the medium or maybe the fine. Dial the compressor back to 30-35 psi and blow a test area on a piece of cardboard or something to be sure you get it how you want it. The more you squeeze the trigger the thicker it comes out. When you get it right, spray the wall in overlapping passes. Keep it moving or the texture will pile up on the wall. The thing is, if you don’t like the result you can scrape it off and try again. If you see a blob or debris - leave it till it dries. Mask off everything you don’t want overspray on. I use the .7 mil plastic sheeting that comes in a 6 pack at HD. Pushpins on the ceiling to hold it. Blue tape to hold the edges. Don’t get the blue tape from Lowe’s. Go to HD. Takes an hour to tape everything off and 5 minutes to spray.
I’m sure I skipped over something so if you have a question feel free.
After it dries take a wide Sheetrock knife or sanding block and LIGHTLY go over everything to knock off any tips and give it a better look.
Hope this helps.
Or, like cgrand said, you can just buy a bunch of cans. They take a little getting used to as that stuff comes out in a hurry.
Posted on 6/26/25 at 1:22 pm to 9rocket
How necessary is the orange peel texture? Is this just to hide imperfections a little bit?
Posted on 6/26/25 at 2:15 pm to jlovel7
Mainly, yes. Without it you will see every tiny flaw. A perfectly smooth wall is not appealing. Just looks wrong.

Posted on 6/26/25 at 4:35 pm to 9rocket
quote:
9rocket
I nominate 9rocket as H&G poster of the month. What a helpful sonnavagun.
Posted on 6/26/25 at 5:53 pm to Baers Foot
quote:
I nominate 9rocket as H&G poster of the month
The dude knows how to float rock I'll give him that.
Posted on 6/26/25 at 8:44 pm to Trout Bandit
A couple of decades of it.
I can honestly say I can’t recall enjoying one minute of floating and I tried to get out of it every time I could.
I can honestly say I can’t recall enjoying one minute of floating and I tried to get out of it every time I could.
This post was edited on 6/26/25 at 8:46 pm
Posted on 7/22/25 at 9:15 am to jlovel7
Bump for update.
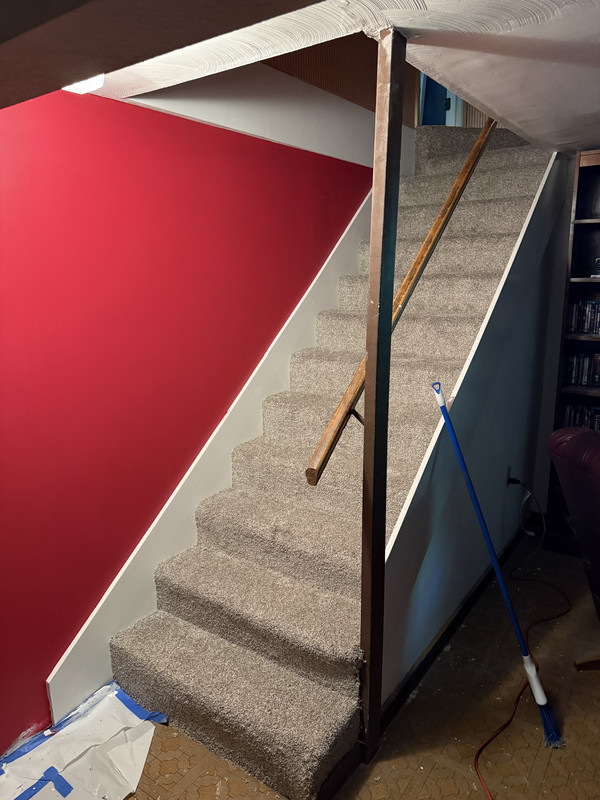
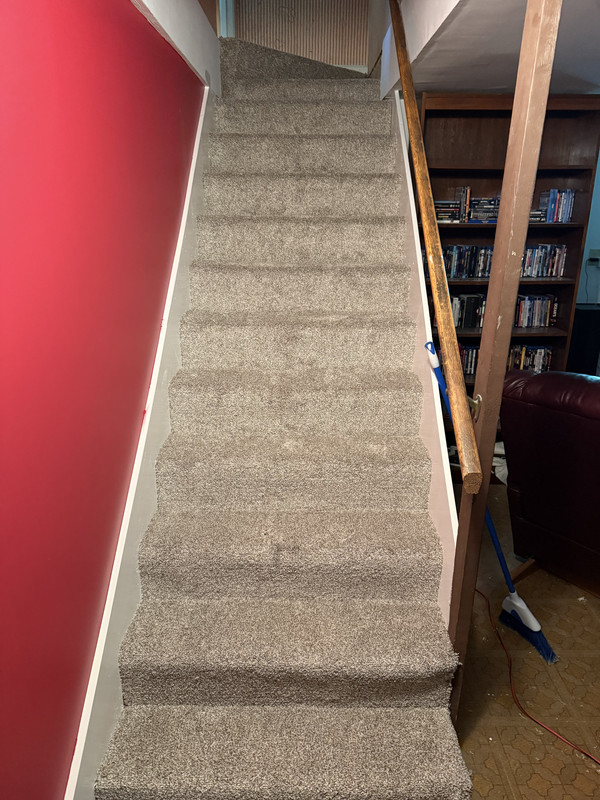
ETA: well this project is almost done. Carpet got installed today. Took 4 fricking coats of paint to get the red to not look streaky. I’ll definitely need to buy more to finish out the room we semi enclosed with my wall. Carpet guys fricked up my trim paint job but oh well. I’ll just have to work on it a bit.
Carpet got installed with materials for $350 and it’s fine. Some areas I will work on a little bit but overall solid. Still need to rip out the drywall in the enclosed room and reinstall with moisture resistant stuff after mold mitigation but that’s a separate project.
Otherwise I am satisfied with the wall. Probably got it built for less than $200 worth of materials between studs, insulation, drywall, mud, and paint. The pre-primed trim was probably the most expensive part.
This post was edited on 7/22/25 at 9:19 am
Posted on 7/22/25 at 10:42 am to jlovel7
Great job !
Was wondering how this was coming along.
Was wondering how this was coming along.
This post was edited on 7/22/25 at 10:44 am
Posted on 7/22/25 at 11:29 am to 9rocket
Thanks! Definitely gives me a lot more confidence going forward. Eventually later this summer or maybe in the winter I’ll be building the theater which will have a lot more floating than just the one wall.
Still needs baseboard and crown molding on the room side but the stair side is done outside of a short piece of baseboard.
I’ll start cutting gyp away in the room to assess the mold situation. It’s been drying out with a dehumidifier. Got the room down to 35-45% humidity and the walls seem to have settled in around 15% moisture after giving it a few days to dry out with the room dehumidified.
This post was edited on 7/22/25 at 11:30 am

Posted on 7/22/25 at 4:08 pm to jlovel7
do not do it
Posted on 7/22/25 at 5:29 pm to FreddieMac
quote:
do not do it

 Page 4 of 4


Popular
Back to top