- My Forums
- Tiger Rant
- LSU Recruiting
- SEC Rant
- Saints Talk
- Pelicans Talk
- More Sports Board
- Fantasy Sports
- Golf Board
- Soccer Board
- O-T Lounge
- Tech Board
- Home/Garden Board
- Outdoor Board
- Health/Fitness Board
- Movie/TV Board
- Book Board
- Music Board
- Political Talk
- Money Talk
- Fark Board
- Gaming Board
- Travel Board
- Food/Drink Board
- Ticket Exchange
- TD Help Board
Customize My Forums- View All Forums
- Show Left Links
- Topic Sort Options
- Trending Topics
- Recent Topics
- Active Topics
Started By
Message
re: Post your Woodworking Projects
Posted on 5/6/19 at 11:01 am to Drunken Crawfish
Posted on 5/6/19 at 11:01 am to Drunken Crawfish
Minwax Polycrylic in the sheen of your choice. Will keep the wood look and enhance the grain pattern. Will only slightly darken it. It's water based so it's easy to work with.
This post was edited on 5/6/19 at 11:02 am
 1
1

Posted on 5/6/19 at 12:00 pm to Drunken Crawfish
Simple bookcase I built for my son's room a year or so ago. This was my first piece of furniture.


Posted on 5/6/19 at 3:57 pm to TIGERBAIT84
Nice. I can’t figure out how to post picture. And I’m good at computers! WTH?
Posted on 5/6/19 at 3:58 pm to TIGERBAIT84
Cypress and cedar?
Posted on 5/6/19 at 4:16 pm to Drunken Crawfish
Oil based will almost always accentuate the grain better than a water-based finish. You could use a wipe-on varnish (I like general finishes Arm-R-Seal), or just a poly. You can also mix your own varnish with BLO, poly, and a thinner (malouf). One that can really get the grain to pop on finer pieces is BLO, 100% tung oil (not your box store tung oil finish), and POLY/varnish.
Posted on 5/6/19 at 4:46 pm to fullstrut
quote:
Oil based will almost always accentuate the grain better than a water-based finish
I have heard that oil based finises will tint yellow over time? Is that accurate? I may look at the wipe on varnish. Everything else seems like a process that I am not quite ready to tackle yet!
Posted on 5/6/19 at 5:14 pm to Drunken Crawfish
I haven't experienced it with GF A.R.S, but I have with straight Poly. The oils in there will be more of an amber color, so it will tint the finish some, but that's also what adds depth to the finish and allows the grain to "pop".
Posted on 5/6/19 at 5:21 pm to Drunken Crawfish
Yea drunken crawfish, oil based finishes will have an amber hue to it. But personally I think that’s a good thing most of the time, unless you’re putting it over white paint or something like that.
Posted on 5/6/19 at 6:25 pm to Chuckd
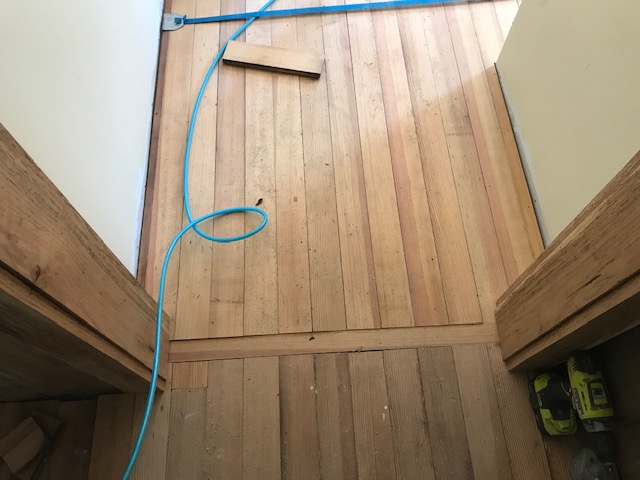
More flooring work today. Full days work. My knees told me, but only have 4 more boards to put down.

Posted on 5/6/19 at 10:02 pm to TigerSprings
Cypress outside, cedar dividers and walnut strips.
I’m going to redo and try without any screws. I was in a hurry so I used kreg screws and they are ugly. One side of me says it gives it an industrial look the other says yuck.
Next few I will try with quite a few different species of wood.
I’m going to redo and try without any screws. I was in a hurry so I used kreg screws and they are ugly. One side of me says it gives it an industrial look the other says yuck.
Next few I will try with quite a few different species of wood.
Posted on 5/6/19 at 10:12 pm to Drunken Crawfish
I made this entertainment center/library thingamajig as a sort of relaxation therapy for when I needed it. The project was a success for the e-center and my therapy.

Except for the crown molding, all the lumber in it is from full 1" stock @ 12"x16'- rough sawn 100 year old heart pine. The molding and trim (other than the crown) is all ripped from the 12" boards. It was hell choosing/grading, edging, planing & preparing the rough stock for such tight tolerances; I no longer had a jointer/planer & thickness planer, and for how little I dabbled in woodworking (both then & now), and for what I wanted this project to be for me, I couldn't justify going to buy new ones. I considered dropping the coin on new floor mounted tooling when I'd get to cussing the cupped, bowed, sappy, rough sawn, beautiful sons of bitches that I was working with, but I wanted the therapeutic treatment from the challenges that woodworking offers us, and I so I plugged away at it.
For me, grabbing a perfectly sharpened, quality handplane and swimming it along with the grain is tonic for the soul. (Till you hit a knot.)
Other than the essentials like a square/straight edge, rotary and belt sander, etc., the main tooling I used to make it was hand planes, a hand operated 4" thickness planer, hand sanding and chamfering, a table saw, sliding compound mitre saw, jigsaw for cutting out the hand drawn arches at the bottom trim, multiple hand saws, an hvlp sprayers and other finishing supplies, and a quick wipe on/wipe off of minwax Golden Oak stain. Having some knowledge of cabinetry from past work helped more than anything (including a 1 1/2 year stint working right under a master cabinet maker, of which I am NOT).
It was pretty basic tooling that I used, and that's the way I wanted it. (But many times I'd of screamed "Hotty Toddy" for a router to be in my hand- and I'd of meant it, too!) I wanted to plug away at it when I needed it, to see what I could come up with, and possibly sell it, give it away or trade it for a rifle scope or something similar. It turned out to be a more intensive labor of love than I set out for, and it wound up being a ~60% handmade piece & without electricity. I liked it so much and became so attached, that I wound up keeping it; it now resides in one of the rooms in my home.
The pics suck, but even though it's just pine, it is 100 year old rough sawn heart pine, and it is beautiful wood with gobs of unique style, and pleasing grain characteristics. When I saw how the lumber's beauty was evolving after each stage of construction, I became adamant about doing as little as was needed in terms of the finish so as to not impede on the wood's beauty. IMO, regarding their completed look and their appeal to the eyes of an observer, a woodworker and his pieces live and die by how strategic he is about finishing the piece. I've seen really nice pieces that a guy churned out, but if he'd of finished them right (or at all), they'd of been stunning.
Character of the wood is why I love rough sawn lumber for these kinds of projects: wood with swagger and character is good for morale when working with it.
I had to summon my old cabinet making days building this one and it all came out tight, square and strong. It ain't much, but it's my homemade, handmade e-center, and if you don't like it, I'll tell you like I told my wife: you can kiss my country white azz!!
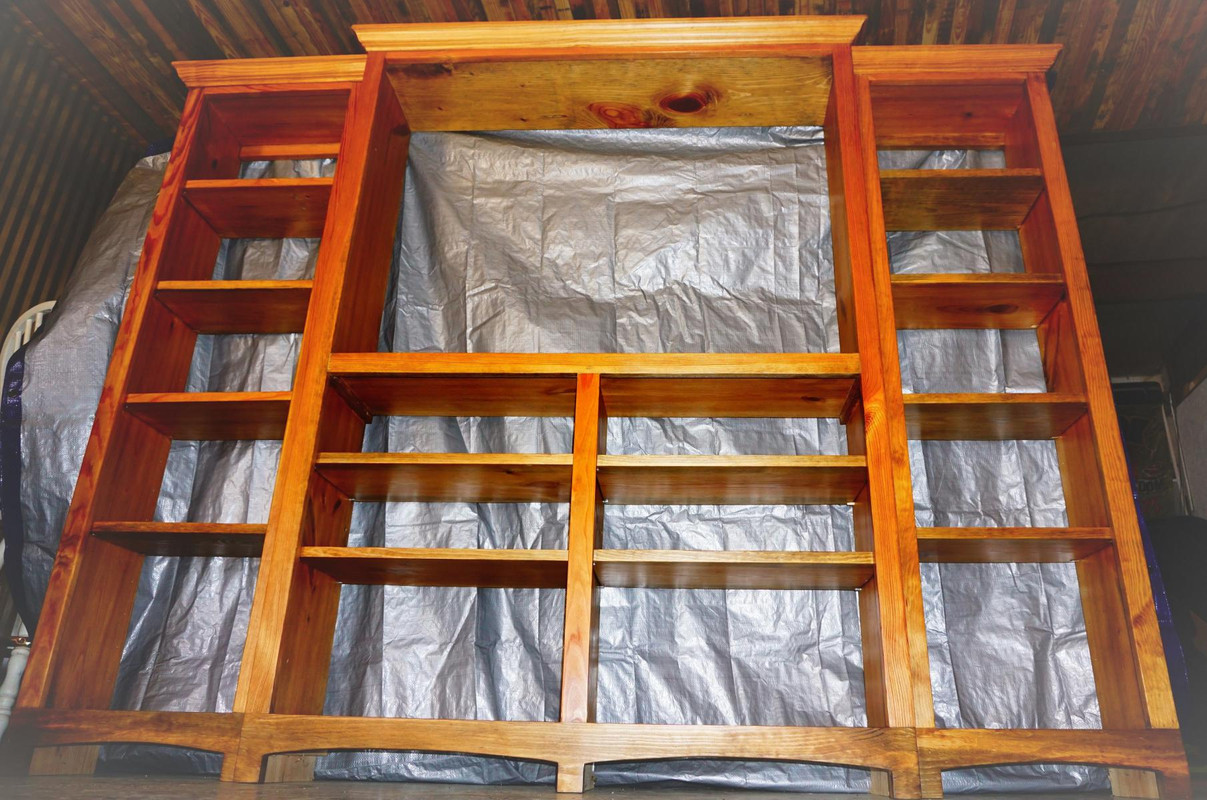

P.S. Good idea for a thread, btw! It's been a goodun so far.
Except for the crown molding, all the lumber in it is from full 1" stock @ 12"x16'- rough sawn 100 year old heart pine. The molding and trim (other than the crown) is all ripped from the 12" boards. It was hell choosing/grading, edging, planing & preparing the rough stock for such tight tolerances; I no longer had a jointer/planer & thickness planer, and for how little I dabbled in woodworking (both then & now), and for what I wanted this project to be for me, I couldn't justify going to buy new ones. I considered dropping the coin on new floor mounted tooling when I'd get to cussing the cupped, bowed, sappy, rough sawn, beautiful sons of bitches that I was working with, but I wanted the therapeutic treatment from the challenges that woodworking offers us, and I so I plugged away at it.
For me, grabbing a perfectly sharpened, quality handplane and swimming it along with the grain is tonic for the soul. (Till you hit a knot.)
Other than the essentials like a square/straight edge, rotary and belt sander, etc., the main tooling I used to make it was hand planes, a hand operated 4" thickness planer, hand sanding and chamfering, a table saw, sliding compound mitre saw, jigsaw for cutting out the hand drawn arches at the bottom trim, multiple hand saws, an hvlp sprayers and other finishing supplies, and a quick wipe on/wipe off of minwax Golden Oak stain. Having some knowledge of cabinetry from past work helped more than anything (including a 1 1/2 year stint working right under a master cabinet maker, of which I am NOT).
It was pretty basic tooling that I used, and that's the way I wanted it. (But many times I'd of screamed "Hotty Toddy" for a router to be in my hand- and I'd of meant it, too!) I wanted to plug away at it when I needed it, to see what I could come up with, and possibly sell it, give it away or trade it for a rifle scope or something similar. It turned out to be a more intensive labor of love than I set out for, and it wound up being a ~60% handmade piece & without electricity. I liked it so much and became so attached, that I wound up keeping it; it now resides in one of the rooms in my home.
The pics suck, but even though it's just pine, it is 100 year old rough sawn heart pine, and it is beautiful wood with gobs of unique style, and pleasing grain characteristics. When I saw how the lumber's beauty was evolving after each stage of construction, I became adamant about doing as little as was needed in terms of the finish so as to not impede on the wood's beauty. IMO, regarding their completed look and their appeal to the eyes of an observer, a woodworker and his pieces live and die by how strategic he is about finishing the piece. I've seen really nice pieces that a guy churned out, but if he'd of finished them right (or at all), they'd of been stunning.
Character of the wood is why I love rough sawn lumber for these kinds of projects: wood with swagger and character is good for morale when working with it.
I had to summon my old cabinet making days building this one and it all came out tight, square and strong. It ain't much, but it's my homemade, handmade e-center, and if you don't like it, I'll tell you like I told my wife: you can kiss my country white azz!!
P.S. Good idea for a thread, btw! It's been a goodun so far.
Posted on 5/6/19 at 11:35 pm to Bigbee Hills
That thing is freakin awesome!
It’d kill me not to mount some lights with a dimmer under the top set of shelves.
Nice work. Well done.
It’d kill me not to mount some lights with a dimmer under the top set of shelves.
Nice work. Well done.
Posted on 5/7/19 at 12:27 am to BRgetthenet
Thanks baw!
Btw, I've thought the same thing about the accent lightjng, and one day I'm gonna do just that.
Btw, I've thought the same thing about the accent lightjng, and one day I'm gonna do just that.
Posted on 5/7/19 at 6:01 am to ducksnbass
quote:
Minwax Polycrylic in the sheen of your choice
This. Go to Harbor Freight and buy a cup spray gun. They sell a real good one for under $15 that sprays polycyclic great.
Posted on 5/7/19 at 9:02 am to TIGERBAIT84
Box or dovetails would look sweet. I'm a sucker for proud, through dovetails. Im about to make a table caddy with those.
Posted on 5/7/19 at 9:03 am to Chuckd
No, is that the only way?
Posted on 5/7/19 at 3:04 pm to TIGERBAIT84
What epoxy do you use and where do you get it?
Also what router bit did you use that the exacto knife or chisel helped with?
Im new to routers so a bit more of an explanation or a YouTube video would be nice.
Good work
Also what router bit did you use that the exacto knife or chisel helped with?
Im new to routers so a bit more of an explanation or a YouTube video would be nice.
Good work
Posted on 5/7/19 at 3:21 pm to WITNESS23
You would use a straight bit for that. Something like this:
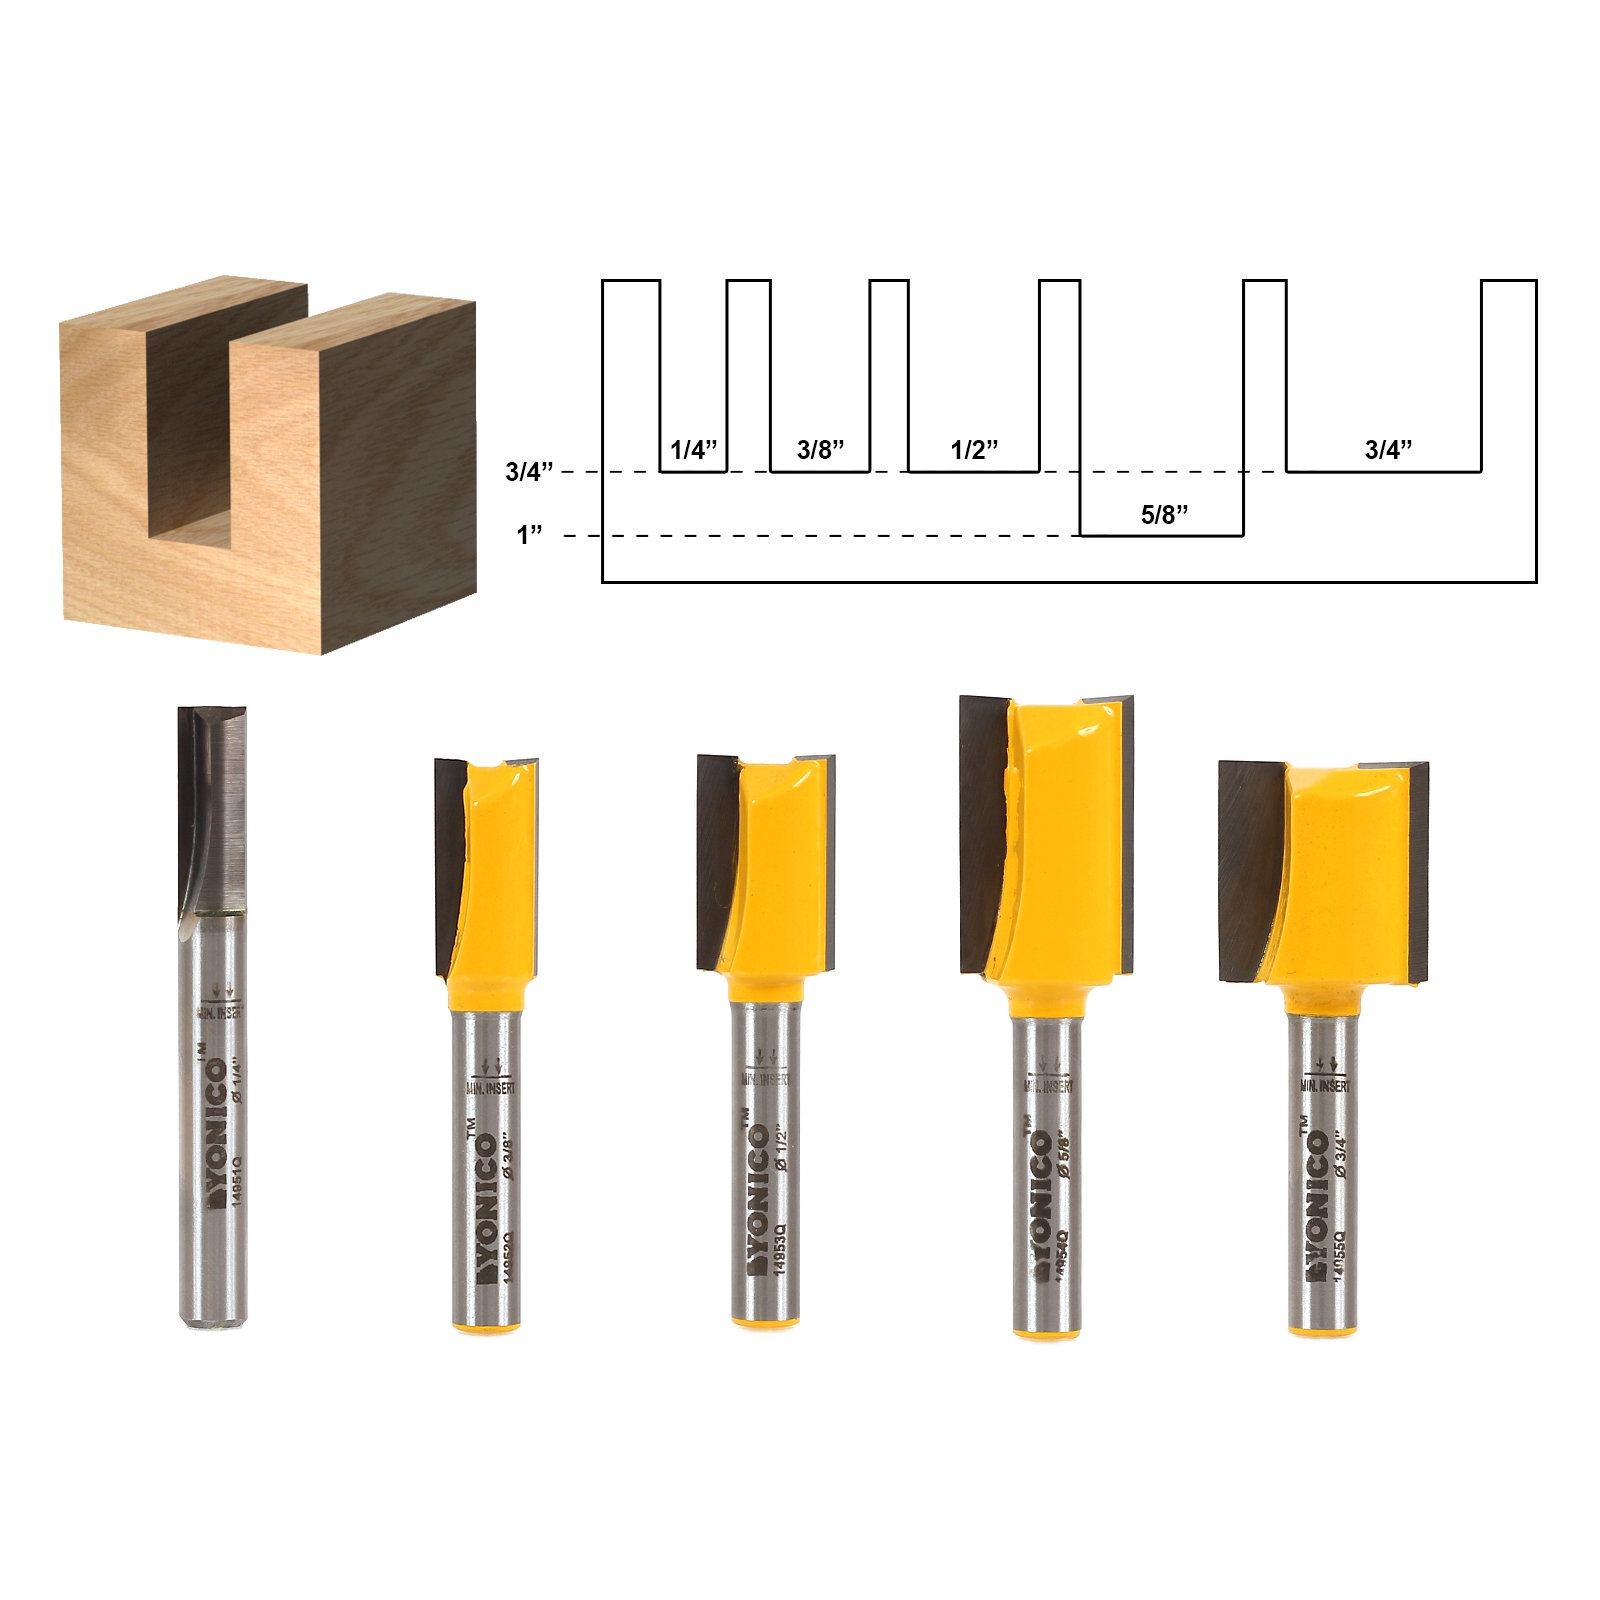
You can also get these with guide bearings on them for following a template. The main purpose of cutting the shape with a knife or chisel first is to cut the wood fibers so the router doesn't fray the edges as it cuts (aka tear-out). This gives you a nice clean edge after routing.
You can also get these with guide bearings on them for following a template. The main purpose of cutting the shape with a knife or chisel first is to cut the wood fibers so the router doesn't fray the edges as it cuts (aka tear-out). This gives you a nice clean edge after routing.

Posted on 5/7/19 at 3:39 pm to Drunken Crawfish
Just finished this for the wife a few weeks ago.


 Page 7 of 17

Popular
Back to top