- My Forums
- Tiger Rant
- LSU Recruiting
- SEC Rant
- Saints Talk
- Pelicans Talk
- More Sports Board
- Fantasy Sports
- Golf Board
- Soccer Board
- O-T Lounge
- Tech Board
- Home/Garden Board
- Outdoor Board
- Health/Fitness Board
- Movie/TV Board
- Book Board
- Music Board
- Political Talk
- Money Talk
- Fark Board
- Gaming Board
- Travel Board
- Food/Drink Board
- Ticket Exchange
- TD Help Board
Customize My Forums- View All Forums
- Show Left Links
- Topic Sort Options
- Trending Topics
- Recent Topics
- Active Topics
Started By
Message
re: Post your Woodworking Projects
Posted on 4/16/19 at 11:28 am to Drunken Crawfish

Posted on 4/16/19 at 11:28 am to Drunken Crawfish
quote:
I am trying to find a way around not having that and a planer.
Really not much you can do otherwise short of bringing it down to size with a hand planer and for such a large table, that would be time consuming. Not sure how accurate that would be as well. Could look into a flattening jig where your router runs across the plane of the material you're working with.
I did watch a YT video for an epoxy table this one guy was building and his table was 15' long x 10' wide and he used a flatting jig on the whole thing and it came out great.
 1
1

Posted on 4/16/19 at 12:41 pm to Drunken Crawfish
quote:
Do you have any more pictures/material list for the farmhouse table?
I don’t have a materials list but legs are from design59furniture. They are the 5 inch chunky legs. The aprons are 1x4’s and I use dominoes to attach them to the legs but I have also used pocket screws in the past and that’s works fine. I make a corner brace behind each leg that is just screwed in regardless of the type of joinery and it makes it so much more rigid.

The table top is held to the apron using “table top fasteners” that slide in some groves cut into the apron. You can see the groove to the right of the leg in the pic above.
The table top itself is just boards glued on edge and clamped. The breadboard ends use a traditional mortise and tenon in order to allow for expansion and contraction.

This is the best pic I have of that being done. I usually start with 8 quarter material for the top and shoot for about 6 quarter finished thickness. When I use pine, I go to a hardwood dealer and buy good clear and dry boards, I would stay away from framing lumber if possible.
By the way if my pics are confusing it’s because they are different tables made from different materials and some were in my old garage and some are at my new house.
This post was edited on 4/16/19 at 12:58 pm
Posted on 4/16/19 at 2:21 pm to Chuckd
quote:
The breadboard ends use a traditional mortise and tenon in order to allow for expansion and contraction.
Good job on the breadboards. I see so many of them just glued on or screwed on with pocket hole screws. Looks great until stuff starts contracting or expanding.
Posted on 4/16/19 at 2:48 pm to ducksnbass
Thanks. I think I often go over board when considering wood movement but on something as wide as a table top, it’s best to be safe.
Posted on 4/16/19 at 3:40 pm to Chuckd
quote:
The breadboard ends use a traditional mortise and tenon in order to allow for expansion and contraction.
Norm would be so proud of you.
i'm impressed. you do very good work.
Posted on 4/16/19 at 4:00 pm to Chuckd
Have have two of the same planes you have.
Well, except my my #4 isn’t brass.
Well, except my my #4 isn’t brass.
Posted on 4/16/19 at 4:21 pm to bbvdd
Thanks pirate dude. And bbvd I chose the bronze because I don’t have to worry about rust, I wish they all came in bronze. Now I just need to learn how to use them properly haha
Posted on 4/16/19 at 4:34 pm to Chuckd
That small block plane is the best. I use mine all the time.
Posted on 4/16/19 at 5:20 pm to bbvdd
Yea it’s my most recent one but has become my favorite. Although the rabetting block plane is great for cleaning up tenons like a shoulder plane.
Posted on 4/16/19 at 5:22 pm to Chuckd
quote:
Although the rabetting block plane is great for cleaning up tenons like a shoulder plane.
I have a veritas shoulder plane that i use for that.
Posted on 4/16/19 at 6:01 pm to Chuckd
What did you use for the finish?
Posted on 4/16/19 at 6:38 pm to idlewatcher
quote:
Really not much you can do otherwise short of bringing it down to size with a hand planer and for such a large table, that would be time consuming
Google router sled. Easy to build and to use to level out a table top.
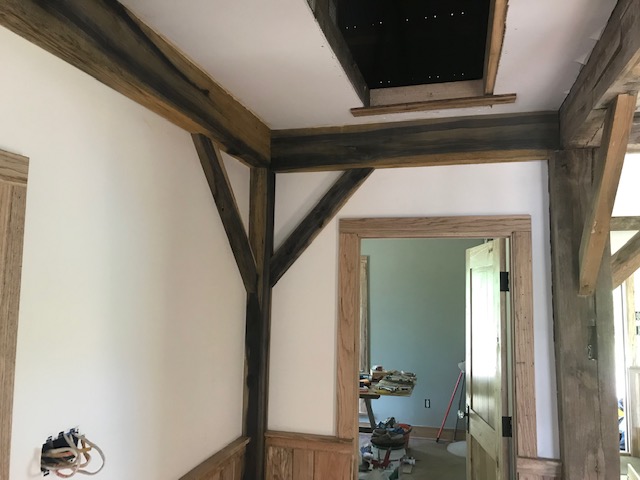
Finished out these new beams in my guest house I am building.
Posted on 4/16/19 at 9:39 pm to pchwinner
quote:
What did you use for the finish?
On the walnut table I used osmo polyx and the pine table I used minwax dark walnut stain then finished minwax water based poly
Posted on 4/16/19 at 10:46 pm to Chuckd

Started cutting and torching some pine 1x2s for a new project I am working on. Next is to put some tinted stain and a company logo on it.
You can see the DC woodworking shop currently consists of two sawhorses and a scrap 1x8

Posted on 4/16/19 at 10:58 pm to Drunken Crawfish
You can't have too many of those cheap folding sawhorses. I recently welded up a 14' rolling gate frame with six of them, two roller material stands, and a JawStand XP (which is a great tool for those with limited working space).
Posted on 4/18/19 at 2:36 pm to Clames
Instead of going with the American flag I decided I would try and use the torch and tint method on something else. One of our good family friends got new position and I made this for his office.

Before stain.

After tinted stain and logo paint. Not a huge fan of the way the white looks. I may hit it with another coat or two, but I don't want to take away from the burnt wood grain. I cheated and ordered the letters already cut out, but I had to cut the other part of the logo by hand with a handheld saw. All I have left to do is hit it with a clear coat.
Before stain.
After tinted stain and logo paint. Not a huge fan of the way the white looks. I may hit it with another coat or two, but I don't want to take away from the burnt wood grain. I cheated and ordered the letters already cut out, but I had to cut the other part of the logo by hand with a handheld saw. All I have left to do is hit it with a clear coat.
This post was edited on 4/18/19 at 2:39 pm
Posted on 4/18/19 at 3:14 pm to Drunken Crawfish
Looks good. Have you considered making the logo bigger ?
Posted on 4/18/19 at 3:17 pm to Chuckd
No, just because I don't want to re-make all of that. I may take a bit off of the backing boards

Posted on 4/19/19 at 9:11 am to Drunken Crawfish


Posted on 4/19/19 at 10:38 pm to ItNeverRains
very good work itneverrains

 Page 2 of 17

Popular
Back to top