- My Forums
- Tiger Rant
- LSU Recruiting
- SEC Rant
- Saints Talk
- Pelicans Talk
- More Sports Board
- Fantasy Sports
- Golf Board
- Soccer Board
- O-T Lounge
- Tech Board
- Home/Garden Board
- Outdoor Board
- Health/Fitness Board
- Movie/TV Board
- Book Board
- Music Board
- Political Talk
- Money Talk
- Fark Board
- Gaming Board
- Travel Board
- Food/Drink Board
- Ticket Exchange
- TD Help Board
Customize My Forums- View All Forums
- Show Left Links
- Topic Sort Options
- Trending Topics
- Recent Topics
- Active Topics
Started By
Message
Woodworking gurus - need help with a specific design
Posted on 1/22/25 at 5:18 pm
Posted on 1/22/25 at 5:18 pm
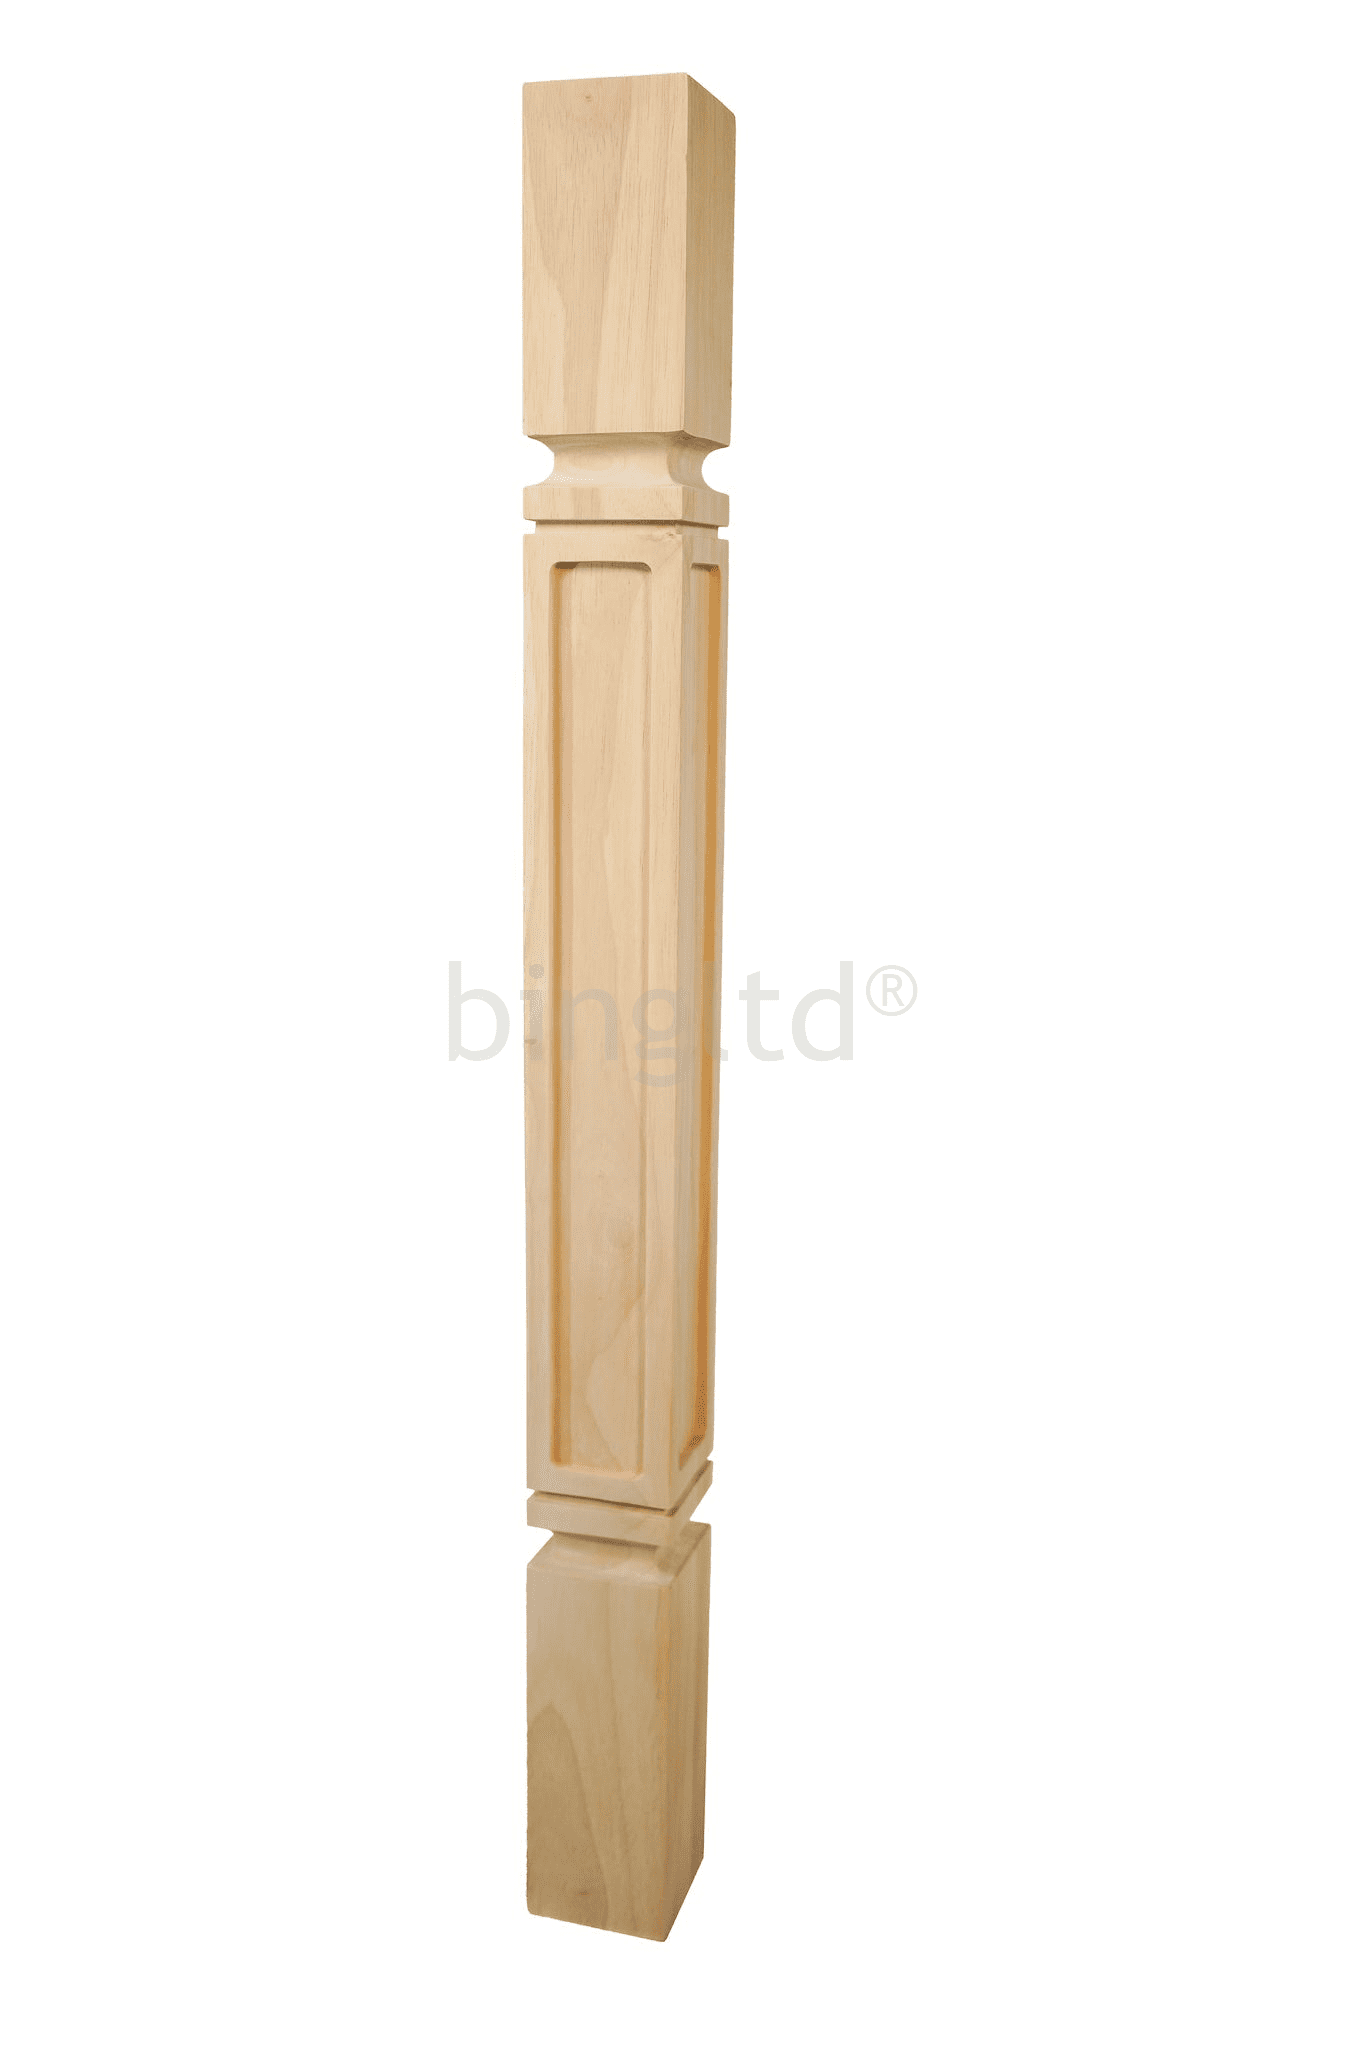
I’m looking to make some columns like the one below. The specific feature I’m looking to do is the inset in the longest portion of the column. I have a plunge router to do this but I’d like to watch some YouTube videos on jig making to make this repeatable as I need to build at least 12 of these columns. The problem I’m running into is what to search for to find that. What’s that technique called? I’ve tried everything I can think of but nothing is pulling back anything that I’m looking for.
Plunge inset
Plunge indentation
Mission style column routing
Routing a recess
Help appreciated!
Plunge inset
Plunge indentation
Mission style column routing
Routing a recess
Help appreciated!
 7
7


Posted on 1/22/25 at 5:37 pm to VanRIch
Looks like an elementary recess. You could do it with a jig that included two parallel 2x4s creating a slot to hold your workpiece underlying a rectangle frame sized to allow you to run your routers base around the inside to rout the outer shape of the recess, then just go back and forth manually to hog out the stuff in the middle
Posted on 1/22/25 at 5:58 pm to VanRIch
I take it you don't have a router table. If you had one of them with proper guides, it would be a piece of cake to do that removal and there is a simple technique you could follow to remove most all of it except squaring up the corners, and that is done with a sharp chisel.
Posted on 1/22/25 at 6:06 pm to VanRIch
Just cut out the size you want for the routes area from a long skinny piece of 1/2 inch MDF. Clamp it to the piece where you want it and get to routing. I like the previously posted idea of using some 2x4s or other pieces of wood to sit on each side of the piece for alignment. You could also attach an alignment piece to one end of the jig to keep that uniform easily as well and then setting up for each cut is fast.
Posted on 1/22/25 at 6:50 pm to VanRIch
You want a pattern bit and to make a pattern that fits tightly to the leg, so that you can’t mess up the positioning. Because if you can mess up the positioning, you will mess up the positioning. At least I tend to at least once.
Posted on 1/22/25 at 6:54 pm to ChEgrad
Thanks everyone. I’ll give this all a more in depth look and see what seems best for my setup. I don’t have a router table.

Posted on 1/22/25 at 8:14 pm to VanRIch
You can do something like Cam does to install the table legs. Instead of using a guide bushing, you can use a pattern/flush trim bit.
Posted on 1/23/25 at 7:45 am to 2 Jugs
I should downvote you, because now all I want to do is watch woodworking videos all day. But, the video is on point and a good idea for the OP. Now, I got some youtoobin to do today.
Posted on 1/23/25 at 9:44 am to WhiskeyThrottle
Foureyes furniture
Shawn Boyd made this
hffcom (Mitch Rudman has some good instructional videos)
Inspire Woodworking (Jamie has lots of how-to tips)
Johnny Builds
Bourbon Moth
Plenty more out there.
Pallet woodworking below:
Dainer Made
Jesper Makes
Shawn Boyd made this
hffcom (Mitch Rudman has some good instructional videos)
Inspire Woodworking (Jamie has lots of how-to tips)
Johnny Builds
Bourbon Moth
Plenty more out there.
Pallet woodworking below:
Dainer Made
Jesper Makes
Posted on 1/23/25 at 10:19 am to gumbo2176
Yep. A good router table (you can even build one or there are nice ones available) and a jig will do what you need.
I make end up making jigs for every single project that end up getting trashed or repurposed after the project. I take as much time as necessary to build a good jig that sets the boundaries for you and you just execute the cut.
Everything is repeatable with a jig or template.
I make end up making jigs for every single project that end up getting trashed or repurposed after the project. I take as much time as necessary to build a good jig that sets the boundaries for you and you just execute the cut.
Everything is repeatable with a jig or template.
This post was edited on 1/23/25 at 10:28 am
Posted on 1/23/25 at 11:56 am to El Segundo Guy
quote:
A good router table (you can even build one or there are nice ones available)
I built my own when I had a nice old stand that was at a perfect height to make my own. I used 3/4 inch plywood for the table and doubled it where the router would hang from Underneath.
I then routed out a spot the depth of an aluminum plate I inserted flush to the top to secure my 3 hp Porter Cable router to and then mounted an adjustable fence I had lying around to keep things straight.
Many of my 1/2 in. shank bits do have the roller guides that make the fence a moot point. I also have a way to mount some finger boards to the table to hold my workpiece tight to the bit so they cut true.
Posted on 1/23/25 at 2:31 pm to VanRIch
Is it tapered? Hard to tell in the picture - not that it makes any difference but it being tapered would make it slightly more difficult to do.
The cove at the top and bottom are simple straight up router jobs unless its tapered. The same is true of the reveal at the top and bottom...simple router job or a dado set in a table saw or even a flat face blade in a table saw and a series of cuts.
Is there a deeper recess around the edges of the faces are is it the same depth? Hard to tell in the picture but again only makes it a little harder. If it is not a simple jog and pattern cutting bit will easily do the job....remove about 1/8 of an inch at a time. If you want to save some time drill a series of holes with a forstner bit and remove the material with a router....or remover part of the recess with a circular saw or even a table saw and remove the rest with a router bit. Will be fairly easy to do. Will take some time anyway you do it. If it is tapered it is going to be harder.
Posted on 1/24/25 at 11:16 am to AwgustaDawg
Not sure if the pic is of a tapered one but I do not want a tapered one anyway. I’ll be doing a straight leg.

Posted on 1/24/25 at 12:41 pm to VanRIch
Get one of your boys with a CNC to make you a template and then use your plunge router. Solved.

 Page 1 of 1


Popular
Back to top