- My Forums
- Tiger Rant
- LSU Recruiting
- SEC Rant
- Saints Talk
- Pelicans Talk
- More Sports Board
- Fantasy Sports
- Golf Board
- Soccer Board
- O-T Lounge
- Tech Board
- Home/Garden Board
- Outdoor Board
- Health/Fitness Board
- Movie/TV Board
- Book Board
- Music Board
- Political Talk
- Money Talk
- Fark Board
- Gaming Board
- Travel Board
- Food/Drink Board
- Ticket Exchange
- TD Help Board
Customize My Forums- View All Forums
- Show Left Links
- Topic Sort Options
- Trending Topics
- Recent Topics
- Active Topics
Started By
Message
re: Tips for floating drywall? Update: Maybe ready to prime?
Posted on 6/12/25 at 9:00 pm to jlovel7
Posted on 6/12/25 at 9:00 pm to jlovel7
Take a razor knife and make slits wherever you see air bubbles(after it dries) and slide, smoosh some mud under the tape and flatten it out. In really bad sections just razor knife on each end of the bad sections and put some mud and new tape. Doesn’t hurt a thing. They do have to be addressed or the bubbles will be there forever.
Good job.
Use the lightweight mud on subsequent coats, much smoother and easier to work with (and a whole lot easier to sand).
Good job.
Use the lightweight mud on subsequent coats, much smoother and easier to work with (and a whole lot easier to sand).
 1
1

Posted on 6/12/25 at 9:03 pm to 9rocket
quote:
Good job. Use the lightweight mud on subsequent coats, much smoother and easier to work with (and a whole lot easier to sand).
Will do. Thanks!
Posted on 6/12/25 at 9:14 pm to jlovel7
9rocket knows his floating. I could have used his advice when I floated a couple of bathrooms in my house last year.
Posted on 6/12/25 at 9:42 pm to Trout Bandit
quote:
9rocket knows his floating. I could have used his advice when I floated a couple of bathrooms in my house last year.
My wife asked why I fist pumped when I saw him say good job.

Posted on 6/13/25 at 11:07 am to Trout Bandit
quote:I feel for anyone on a tight budget, and I understand the thought that it is doable, it is not, unless you have worked with it a touch you just cant do it correctly. I wish him the best
I'm not trying to be an arse but all that rippled tape will never look right man.
Posted on 6/13/25 at 2:56 pm to tigerfoot
quote:
feel for anyone on a tight budget, and I understand the thought that it is doable, it is not, unless you have worked with it a touch you just cant do it correctly. I wish him the best
I’m getting divided responses here and on Reddit. Half the people say yeah this is fine and you can work this out in future layers. Half the people say I’m fricked.
So what is it
Posted on 6/13/25 at 3:02 pm to jlovel7
quote:
So what is it
Posted on 6/13/25 at 3:09 pm to jlovel7
It’s fine. Address any problem areas on subsequent coats. Don’t stress.
Mud is very forgiving. You can put more mud then sand it off until you are satisfied.
Mud is very forgiving. You can put more mud then sand it off until you are satisfied.
Posted on 6/13/25 at 3:22 pm to 9rocket
quote:
It’s fine. Address any problem areas on subsequent coats. Don’t stress. Mud is very forgiving. You can put more mud then sand it off until you are satisfied.
Great. This is what I was hoping for. I know sanding sucks but since I’m the client, I’m not on any timeline. I can keep working this until it’s right. Just don’t want to start over if I can avoid it.
I’ll send updated pics after the next steps to check progress.
Posted on 6/13/25 at 4:29 pm to DMAN1968
quote:
HEAVY texture hides a lot
Yes and no. If somebody cannot develop a nice uniform wall working the mud, they are unlikely to be able to spray a uniform textured surface. Start inside closets and other well-hidden areas.
Posted on 6/13/25 at 8:03 pm to Tree_Fall
quote:
HEAVY texture hides a lot
It does, but it also does not hide a lot. Some things are even more noticeable.
Posted on 6/24/25 at 9:44 pm to jlovel7
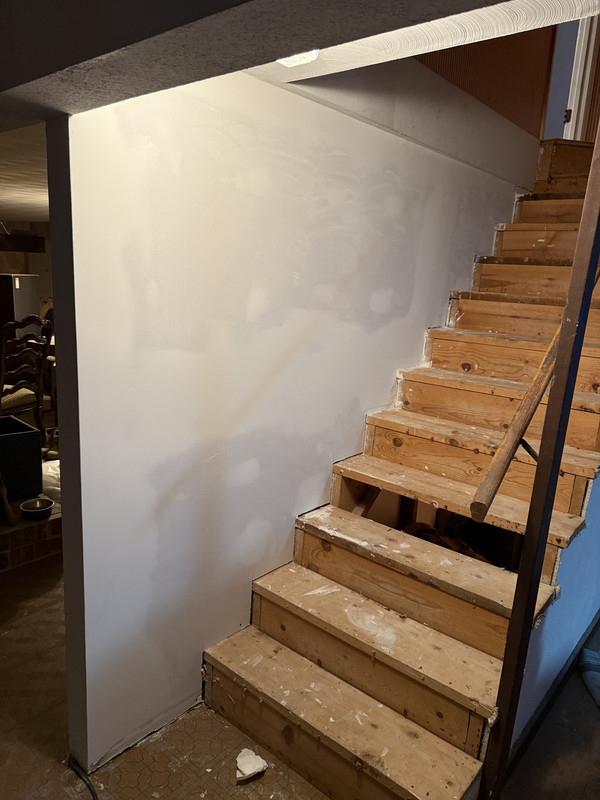
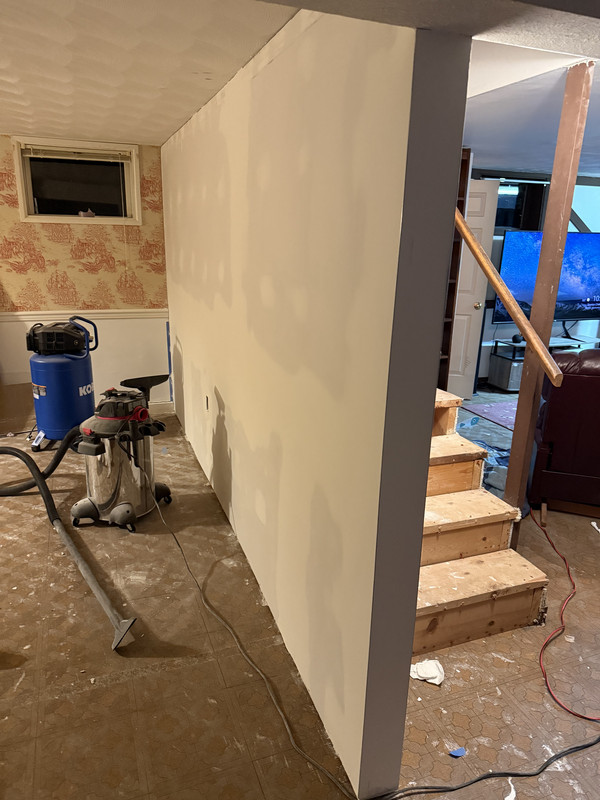
Update: added 3 coats of tapered and sanded. I think I’m ready for prime? There’s a few spots that are minority visible when I shine a light directly sideways on the wall. We have visitors coming this weekend so I will likely hit it with a little more sanding to flatten it out and hopefully call it a day and prime and paint.
Posted on 6/25/25 at 7:11 am to jlovel7
So, what are your plans for where the wall meets the ceiling and you have that swirl texture??? You may have mentioned it in a prior post, but I'm not reading through 3 pages.
I'll assume some type trim to cover that open seam because you don't want to get involved in trying to tape a seam in that area and then trying to match that swirl pattern.
I'll assume some type trim to cover that open seam because you don't want to get involved in trying to tape a seam in that area and then trying to match that swirl pattern.
Posted on 6/25/25 at 7:34 am to jlovel7
that came out good dude. I gotta ask though if it was worth it? That’s a two day job max for a pro and only because you have to let the mud dry. Couple hundred bucks max and you could be looking at a finished product
on the other hand, now you know how to finish drywall
on the other hand, now you know how to finish drywall
Posted on 6/25/25 at 7:37 am to gumbo2176
quote:
So, what are your plans for where the wall meets the ceiling and you have that swirl texture??? You may have mentioned it in a prior post, but I'm not reading through 3 pages. I'll assume some type trim to cover that open seam because you don't want to get involved in trying to tape a seam in that area and then trying to match that swirl pattern.
Crown molding at the top. On the stair side I was actually able to tape and mud and get a relatively clean joint!
And cove molding at the far corner which matched corner molding elsewhere in this room.
Posted on 6/25/25 at 7:41 am to cgrand
quote:
that came out good dude. I gotta ask though if it was worth it? That’s a two day job max for a pro and only because you have to let the mud dry. Couple hundred bucks max and you could be looking at a finished product on the other hand, now you know how to finish drywall
I have to do it again in a few weeks/months for an entire home theater so glad I had this to practice on.
Not gonna lie, it absolutely sucked. Very messy and just super stressful. But each coat got easier so I imagine I’ll be better prepared for that. We are in super cost saver mode right now as we just bought the house so even though I’d love to have a pro do it and not worry, even a few hundred backs could go farther for materials elsewhere as we totally turn this house around. Need to stretch every dollar we have as far as we can and that generally means doing our own labor.
Great news is today we put the last coat of paint on upstairs and then the upstairs is totally refreshed with paint in every room and all of our upgrades up there will be done.
I’ve actually been breaking up the drywall work to do landscaping which has been so fun. Getting the yard looking a lot better too.
I’ll definitely mix my own mud going forward as I got used to mixing water in the premix and getting that down. I was just terrified at first how messy that could be but it wasn’t bad. Definitely will help save on costs there. I never realized how much mud I would need even for a single wall. Used a whole bucket of lightweight. So for a full room with two sides to it I want to he cost effective and use the powder to make that go farther.
This post was edited on 6/25/25 at 7:43 am
Posted on 6/25/25 at 8:04 am to jlovel7
as you get better you will use WAY less mud. I commend your efforts because yes, drywall finishing absolutely sucks if it’s not second nature
again, good job
again, good job
Posted on 6/25/25 at 8:18 am to cgrand
quote:
Couple hundred bucks max and you could be looking at a finished product
Couple hundreds max to pay someone? You’ve clearly never been quoted drywall
Posted on 6/25/25 at 8:22 am to Craft
quote:you would be wrong LOL
You’ve clearly never been quoted drywall
Posted on 6/25/25 at 1:42 pm to jlovel7
A lamp with no shade on it is better than a flashlight when looking for imperfections. Although, it may show you more than you want to see. Take a pencil and circle everything that needs more attention. Either more mud or more sanding. Then if you have to skim a little mud anywhere, circle the mud while it’s wet so you don’t overlook it when it dries and you need to do touch-up sanding. I would like to see a little more mud on the screwheads, but other than that little nitpick - super job !
Have been wondering how this project was coming along so thanks for the update.
Oh, if you were talking about buying bags of powder and mixing it yourself, be careful there. Get at least the 45 minute if not the 90. When that stuff starts to go off it’s over. You will more than likely waste a lot, and tool cleanup is a bear. Much harder to sand as well. But, it’s up to you. I prefer the buckets so when it’s empty you’ve got a good bucket which always comes in handy.

 Page 3 of 4

Popular
Back to top