




 0
0









- My Forums
- Tiger Rant
- LSU Recruiting
- SEC Rant
- Saints Talk
- Pelicans Talk
- More Sports Board
- Fantasy Sports
- Golf Board
- Soccer Board
- O-T Lounge
- Tech Board
- Home/Garden Board
- Outdoor Board
- Health/Fitness Board
- Movie/TV Board
- Book Board
- Music Board
- Political Talk
- Money Talk
- Fark Board
- Gaming Board
- Travel Board
- Food/Drink Board
- Ticket Exchange
- TD Help Board
Customize My Forums- View All Forums
- Show Left Links
- Topic Sort Options
- Trending Topics
- Recent Topics
- Active Topics
Started By
Message
re: Vader’s Model Desk: Soviet KV-1 Heavy Tank
Posted on 8/9/26 at 6:32 pm to Darth_Vader
Posted on 8/9/26 at 6:32 pm to Darth_Vader
Great western storyline
Posted on 8/9/26 at 6:57 pm to Darth_Vader
Wow.. Love the diesel exhaust residue. Fantastic work as usual Sir.
Posted on 8/9/26 at 7:09 pm to Darth_Vader
Superb work brother.
I am just amazed at your painting skills. Every vehicle looks lived in and this one just seems so life like.
Great job.
I am just amazed at your painting skills. Every vehicle looks lived in and this one just seems so life like.
Great job.
Posted on 8/9/26 at 7:20 pm to WWII Collector
quote:
Wow.. Love the diesel exhaust residue. Fantastic work as usual Sir.
Thanks. I thought of the exhaust residue at the last minute before declaring this build done.
Posted on 8/9/26 at 8:20 pm to Darth_Vader
Great work Darth 
Posted on 8/9/26 at 8:33 pm to OK Roughneck
Thanks, Roughneck!
Posted on 8/10/26 at 8:48 am to Darth_Vader
Great job as always
Posted on 8/10/26 at 9:16 am to Darth_Vader
Great job DV! Your attention to detail is outstanding, I look forward these posts!
Posted on 8/10/26 at 9:23 am to Darth_Vader
Holy shite, those tow cables looks like real tow cables... Excellent detail...
Posted on 8/10/26 at 9:45 am to Hangover Haven
quote:
Holy shite, those tow cables looks like real tow cables... Excellent detail...
Thanks. They’re actually made from twine that is included in the kit. All I had to do was cut each into 70mm lengths and connect the eyes to each end, which I painted beforehand. If you look close, you can see it’s just regular twine..
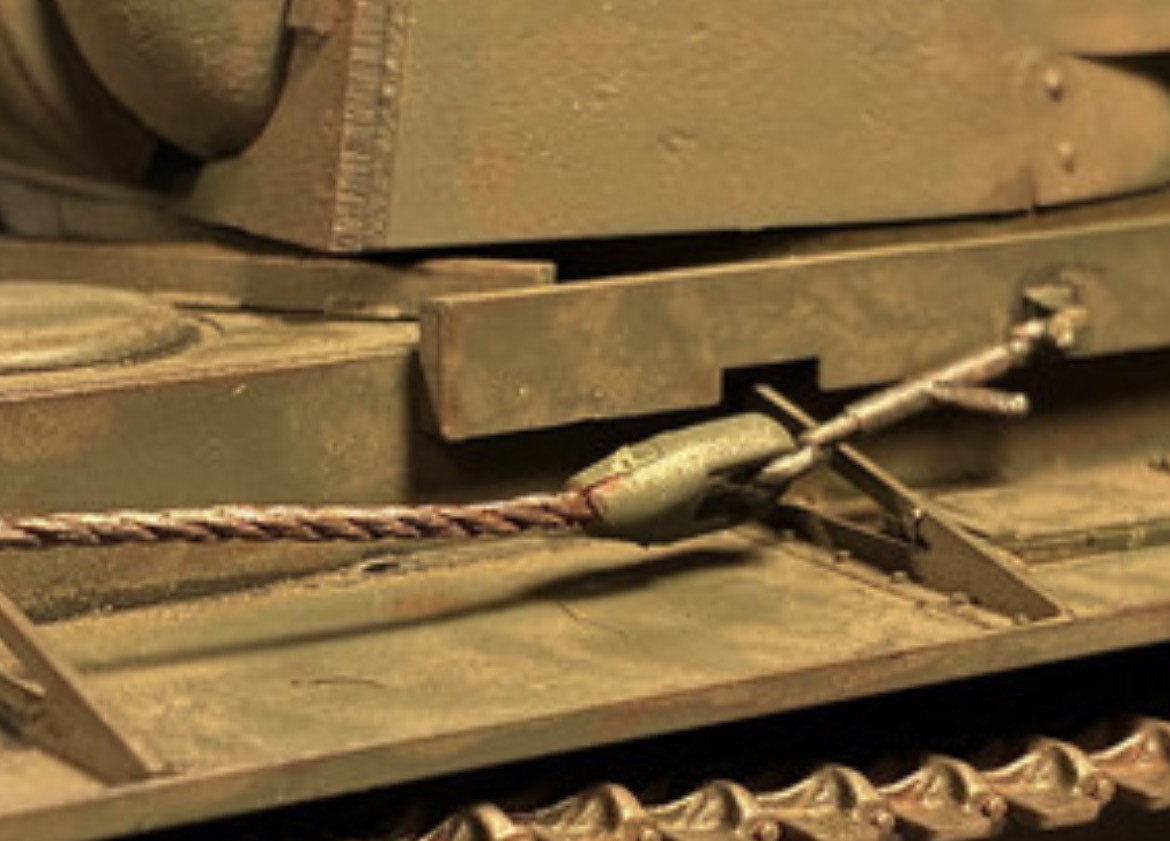
I then painted the twine metallic gray and applied some Flory Rust Wash on top of that to give them a bit of a rusted look.
Posted on 8/10/26 at 9:48 am to Darth_Vader
quote:
, you can see it’s just regular twine..
Well you definitely made it look like a rusted tow line...
You have a great eye for detail...
This post was edited on 8/10/26 at 9:49 am
Posted on 8/10/26 at 10:19 am to Hangover Haven
quote:
Well you definitely made it look like a rusted tow line... You have a great eye for detail...
Much appreciated
Posted on 8/10/26 at 10:24 am to Darth_Vader
Dude, love that model! How did you get the weathering like that? And those tracks look like the metal aftermarket ones!
Great job!!!!
Great job!!!!
Posted on 8/10/26 at 10:32 am to Spaceman Spiff
quote:
Dude, love that model! How did you get the weathering like that? And those tracks look like the metal aftermarket ones! Great job!!!!
Thanks. Here was my process.
Tracks
1. Airbrush Tamiya Metallic Gray
2. Apply Tamiya Deep Brown Panel Accent
Tank
1. Airbrush Tamiya Dark Green
2. Using a piece of natural sponge, dab on Tamiya Brown to give texture and weathered look, use more on corners and other areas to give a more worn appearance to accentuate the overall weathered look of the tank.
2. Apply Tamiya Black panel accent on seems, rivets, etc.
3. Remove excess panel accent using Testors Enamel thinner
4. Using a piece of natural sponge, dab on Flory Deep Brown Wash over entire model and allow dry.
Posted on 8/10/26 at 11:07 am to Darth_Vader
I have the Osprey Publishing book titled Panzerjager vs KV-1. It focused on the static anti-tank guns the Wehrmacht employed and the terrifying shock that came with encountering the KV-1 with their 37mm gun that until that time had been mostly effective against its opposition. The Stielgranate 41 marginally evened the odds, but it was low velocity and short ranged.
The rest of the book covers the evolution to the 75mm Pak 40 as the mainstay as well as the continued up-gunning of the self-propelled arm. All of their books are great.
The rest of the book covers the evolution to the 75mm Pak 40 as the mainstay as well as the continued up-gunning of the self-propelled arm. All of their books are great.
Posted on 8/10/26 at 11:36 am to Darth_Vader
quote:
Thanks. Here was my process.
Man that is legit good! I need to step up my game. I've never used a sponge. Added to mental list

Meanwhile, my Tiger is sitting on the workbench untouched for the last week or so. At least all roadwheels are on (thankfully they were the steel ones meaning no rubber to paint!
I have to put the deck on, but I need to figure out how to get the slight bow out of the upper left side. I may just cut angle plastic use a straight edge and clamps to hold it while the glue sets. Then the deck. For such a damn good kit as RFM makes you would think the upper sides wouldn't have a little bow in them (one side only).
Posted on 8/10/26 at 12:10 pm to SparkyWilson
quote:
I have the Osprey Publishing book titled Panzerjager vs KV-1. It focused on the static anti-tank guns the Wehrmacht employed and the terrifying shock that came with encountering the KV-1 with their 37mm gun that until that time had been mostly effective against its opposition. The Stielgranate 41 marginally evened the odds, but it was low velocity and short ranged.
I believe German soldiers began referring to their 37mm towed anti-tank guns as “door knocker” after first encountering KVs and realizing they might as well be throwing wet noodles at them.
Posted on 8/10/26 at 12:25 pm to Spaceman Spiff
quote:
Man that is legit good! I need to step up my game. I've never used a sponge. Added to mental list
It’s super easy. Just tear off a really small piece of sponge, like 1/4 or less the size of your fingernail and use tweezers to dab it in whatever paint you want to use. Remove excess paint from the sponge by dabbing it on a paper towel before moving on to the model. A little goes a long way and less is more.
Here is an example of creating chipping effects using this technique on an Italian tank I built a few years ago.
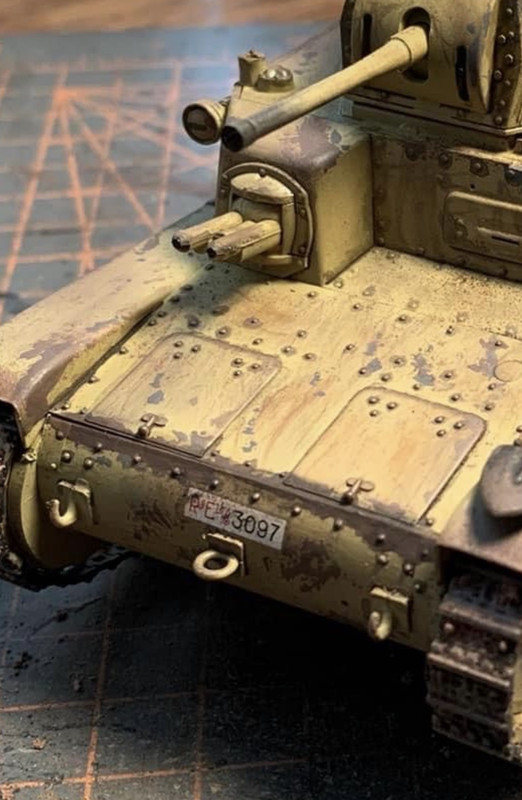
On the Italian rank, I first painted Desert Yellow then dabbed Brown to give it a worn and rusty look.
I also used this same technique, though far more aggressively with more paint than I’d use otherwise, to create a look of very worn white each winter camouflage on this SU-100…
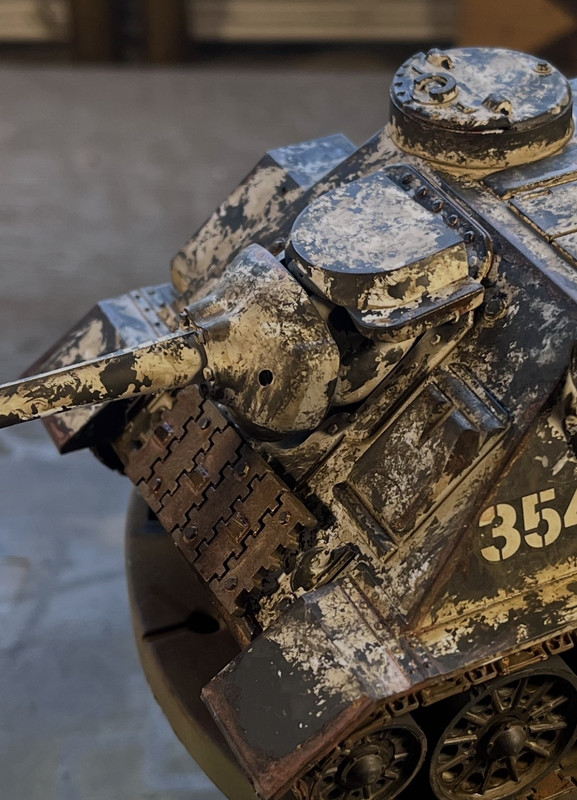
In this instance I painted the vehicle white, then dabbed green to make it look like the whitewash camouflage was wearing off.
Posted on 8/10/26 at 2:52 pm to Darth_Vader
Dude. You are the king. The effects on that Italian job are freaking amazing. Damn sure could teach me a thing or two. Looks real! I don't think I've ever seen one look so real!
Posted on 8/10/26 at 3:52 pm to Spaceman Spiff
quote:
Dude. You are the king. The effects on that Italian job are freaking amazing. Damn sure could teach me a thing or two. Looks real! I don't think I've ever seen one look so real!
Thanks! That one actually won me third place in a model show a few years ago.

 Page 2 of 3


Popular
Back to top
 Follow TigerDroppings for LSU Football News