- My Forums
- Tiger Rant
- LSU Recruiting
- SEC Rant
- Saints Talk
- Pelicans Talk
- More Sports Board
- Fantasy Sports
- Golf Board
- Soccer Board
- O-T Lounge
- Tech Board
- Home/Garden Board
- Outdoor Board
- Health/Fitness Board
- Movie/TV Board
- Book Board
- Music Board
- Political Talk
- Money Talk
- Fark Board
- Gaming Board
- Travel Board
- Food/Drink Board
- Ticket Exchange
- TD Help Board
Customize My Forums- View All Forums
- Show Left Links
- Topic Sort Options
- Trending Topics
- Recent Topics
- Active Topics
Started By
Message
Bypassing a ballast - need help
Posted on 3/27/21 at 1:38 pm
Posted on 3/27/21 at 1:38 pm
I want to put LED bulbs in my garage fixtures. I watched a few videos on how to bypass the ballast, and it seemed easy enough - snip and connect. Then I opened up my fixture and saw that mine isn't wired like any of the ones I saw in the videos.
Here's how the power comes in to the fixture. Both the hot and neutral come in to the fixture and then go through a splice. The neutral goes to one bulb fixture and the hot goes to the other bulb fixture. The neutral and hot then leave the bulb fixture and travel to the ballast, then come out the other side in blue and red. The blue goes to one fixture and the red goes to another fixture.
A couple questions:
1) Can I keep everything upstream of the ballast the same?
2) Is the blue or red wire the hot wire that connects to my black hot wire?
This post was edited on 3/27/21 at 1:39 pm
 2
2

Posted on 3/27/21 at 3:06 pm to BottomlandBrew
I’ve converted every fluorescent fixture in my house, carport and storage shed to LED, but it’s been 5 + years ago.
I remember you remove the ballast and all blue and red wiring to the terminal pins - they are there just to hold the bulb now. But I can’t for the life of me remember off hand the hook up of the black hot and white neutral to the two forward pins that provide power to the LED bulb.
I’m going to wait and a bit see if someone else can remember and answer your question, but if not I’ll take the protective cover off one of mine and snap a photo to show you my hook up. (They are easy to take off but sometimes a bitch to put back on hence my delay - LOL).
The YouTube videos certainly helped but my LED bulbs came with a diagram of the proper white and black wire connections to the 2 forward pins that I followed. Your LED bulbs not come with a wiring diagram?
ETA: OK, I’m hoping this video will help you with the correct connection. I’m pretty sure this is how I wired my dual bulb fluorescent fixtures for LED as I used this same style style LED bulb.
LINK
This post was edited on 3/27/21 at 3:53 pm
Posted on 3/27/21 at 4:09 pm to CrawDude
quote:
Your LED bulbs not come with a wiring diagram?
I was holding off on purchasing them until I was sure I could do it. I've looked up several wiring diagrams online, but none match my setup. Here is my existing wiring diagram. It's weird. It doesn't make sense to me that my power would be going directly to one side of the fixtures before going to the ballast and then going back out to the other side of fixtures.


Posted on 3/27/21 at 8:05 pm to BottomlandBrew
My advice, after having converted four lights. TL;DR warning.
- On the first fixture I bought bulbs that worked with the ballast. Don't make that mistake. Direct wire bulbs or nothing.
- Select the bulb with the right color temperature for the application.
- If you are anal/OCD like me you'll also buy new tombstones (the plastic tube holder/connectors at each end of the fixture).
- Once your bulbs arrive, read the instructions which will include a wiring diagram. On all of mine the power connections were on one end only. That make wiring very easy.
- Turn off power to the fixture, remove the center reflector/wire cover and disconnect the incoming power wiring from the ballast. Remove the ballast and all four tombstones.
- Cut off four pieces of wire (two red, two blue for example) from the ballast that are long enough to reach from the incoming power wiring to one end of the fixture.
- If you reuse the tombstones, get a small nail or pick, push into the top to release the spring hold the old wiring on.
- Take two tombstones, label one side "H" and one side "N" to match the bulb instructions. Insert wiring into each tombstone, color "A" to "H", color "B" to "N".
- Insert the tombstones into one end of the fixture. Connect wire color "A" to the incoming power black wire, wire color "B" to the incoming power white wire.
- Tuck in your wiring so it fits beneath the reflector and reinstall the reflector.
- Insert new bulbs so that their wired end mates with your wired end.
- Turn on power. You should have lights and no smoke.
If you are really anal/OCD (NTTAWWT), buy some TFN appliance wire too. That way you can prewire your tombstones and everything will match.
Good luck
Posted on 3/27/21 at 10:32 pm to Unobtanium
I installed LED T8 bulbs in my 20 year old shop fixtures a few months ago. No reason to change the end brackets [tomstones]. Just cut the wires close to the old ballast and connect the same color wires together.
I installed 24 watt [6000k] bulbs made by Barria, A smaller wattage bulb would have been bright enough, but these bulbs really light up my shop.
The total cost was about $ 10 per fixture and now when I flip the switch... there is bright lighting. I wish I would have done this a long time ago.
I installed 24 watt [6000k] bulbs made by Barria, A smaller wattage bulb would have been bright enough, but these bulbs really light up my shop.
The total cost was about $ 10 per fixture and now when I flip the switch... there is bright lighting. I wish I would have done this a long time ago.
Posted on 3/27/21 at 11:10 pm to gerald65
I did provide a disclaimer:
So as long as it works
quote:
if you are anal/OCD
So as long as it works
Posted on 3/28/21 at 1:57 am to BottomlandBrew
I changed a basic two tube florescent light fixture to LED bulbs a year ago. I used "single ended power" LED bulbs instead of "dual ended power" bulbs. With single ended bulbs, you can remove all of the red and blue wiring in your picture because no wires will be run to that end.
With "single ended power" the bulbs are just powered from one end, and the LED bulbs should come with non-shunted lamp holders. I recall 1) Removing the ballast and all of the wires attached to it, 2) Replacing all four lamp holders with the ones provided with my LED bulb kit, 3) Wiring the two new lamp holders just on the powered end (the ones with wires attached) to the existing white (neutral) and black (hot) wires coming into the fixture. I just used the existing wire nuts (like the two yellow ones in your picture).
It was so simple and easy to use SEP (Single ended power) bulbs that come with non-shunted lamp holders. The YouTube videos should really only be one minute long and they overly complicate it from what I recall.
If you use Double Ended Power bulbs (with Shunted lamp holders) you'll be wiring all 4 lamp holders. Not a big deal, but its just simpler and faster to convert to Single Ended Power fixtures.
I bought my LED Bulb Kit at Home Depot. The manufacturer of the kit (4' bulbs) was named "Toggled"
Home Depot Item Description:
48 in.16-Watt Cool White T8 or T12 Dimmable Linear LED Tube Light Bulb (2-Pack) by toggled
NOTE: This Home Depot item also has choices for Daylight or Soft White.
See the link above for this item on HomeDepot.com (Just decide on Cool White, Daylight or Soft White). We used Cool White in our kitchen.
Look at the pictures that Toggled provided on Home Depot, plus look at the video they have on Home Depot. Two of the lamp holder ends have no wiring as they just hold the bulb. The other two powered lamp holders each have one black wire and one white wire. You instinctively know what to do (i.e wire those two white wires to your home white wire and wire those two black wires to your home black wire).
It is so easy to just remove all four existing lamp holders, unscrew the ballast and take it out with all of the existing wiring except your house wiring, then pop in the four new lamp holders, and wire the two lamp holders (with wiring) to your existing white and black wiring coming into the fixture. Just wire all of the white wires together and wire all of the black wires together.
It should take you about 5 minutes.
NOTE: I didn't cut any of the existing wires. YouTube videos and perhaps the instructions tell you to cut wires. You don't need to cut any wires. I just disconnected the black and white wires to the ballast (from my home wiring) by removing the ballast wires from the "black" and white" wire nuts and I popped out the 4 existing lamp holders. At that point the lamp holders and all existing wiring was just hanging from the ballast. I unscrewed the ballast and it plus all of the existing wiring were pulled out together in one clean motion. In the event that the new kit didn't work, I could have easily reinstalled the whole old kit since 100% of the "old" wiring is still attached to the ballast and 4 lamp holders. If you start cutting wires, it is just more unneeded steps.
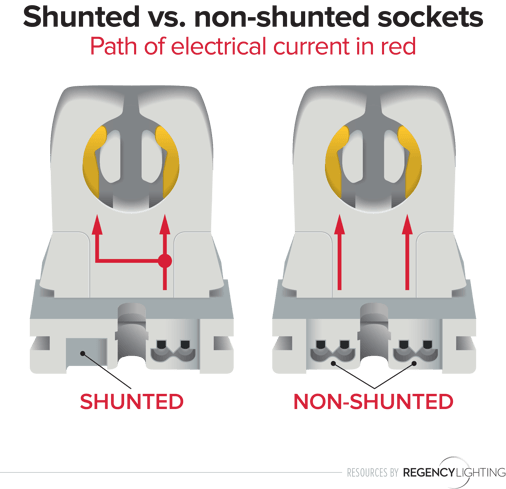
I also wanted to show you the difference in shunted vs. non-shunted lamp holders. If you choose a single ended power bulb kit like the one I linked to above, you will have non shunted lamp holders at the powered end and each have a black wire and a white wire. If you instead choose double ended power bulbs, each lamp holder would be shunted and only have one wire for each lamp holder.
NOTE: My only concern about your particular installation is that your existing white lamp holders look strange and I cannot tell how they pop out and new ones attach. You have shunted lamp holders, so if you go with single ended power bulbs like I prefer, the existing lamp holders have to be replaced. I cannot tell if the Toggled lamp holders (which are the standard slide in slide out type) would work for your installation. If you ordered these from home depot, they would be an easy return. You may have that same issue with no matter what kit you buy, so that is another reason to buy from Lowes or Home Depot for an easier return if needed.
With "single ended power" the bulbs are just powered from one end, and the LED bulbs should come with non-shunted lamp holders. I recall 1) Removing the ballast and all of the wires attached to it, 2) Replacing all four lamp holders with the ones provided with my LED bulb kit, 3) Wiring the two new lamp holders just on the powered end (the ones with wires attached) to the existing white (neutral) and black (hot) wires coming into the fixture. I just used the existing wire nuts (like the two yellow ones in your picture).
It was so simple and easy to use SEP (Single ended power) bulbs that come with non-shunted lamp holders. The YouTube videos should really only be one minute long and they overly complicate it from what I recall.
If you use Double Ended Power bulbs (with Shunted lamp holders) you'll be wiring all 4 lamp holders. Not a big deal, but its just simpler and faster to convert to Single Ended Power fixtures.
I bought my LED Bulb Kit at Home Depot. The manufacturer of the kit (4' bulbs) was named "Toggled"
Home Depot Item Description:
48 in.16-Watt Cool White T8 or T12 Dimmable Linear LED Tube Light Bulb (2-Pack) by toggled
NOTE: This Home Depot item also has choices for Daylight or Soft White.
See the link above for this item on HomeDepot.com (Just decide on Cool White, Daylight or Soft White). We used Cool White in our kitchen.
Look at the pictures that Toggled provided on Home Depot, plus look at the video they have on Home Depot. Two of the lamp holder ends have no wiring as they just hold the bulb. The other two powered lamp holders each have one black wire and one white wire. You instinctively know what to do (i.e wire those two white wires to your home white wire and wire those two black wires to your home black wire).
It is so easy to just remove all four existing lamp holders, unscrew the ballast and take it out with all of the existing wiring except your house wiring, then pop in the four new lamp holders, and wire the two lamp holders (with wiring) to your existing white and black wiring coming into the fixture. Just wire all of the white wires together and wire all of the black wires together.
It should take you about 5 minutes.
NOTE: I didn't cut any of the existing wires. YouTube videos and perhaps the instructions tell you to cut wires. You don't need to cut any wires. I just disconnected the black and white wires to the ballast (from my home wiring) by removing the ballast wires from the "black" and white" wire nuts and I popped out the 4 existing lamp holders. At that point the lamp holders and all existing wiring was just hanging from the ballast. I unscrewed the ballast and it plus all of the existing wiring were pulled out together in one clean motion. In the event that the new kit didn't work, I could have easily reinstalled the whole old kit since 100% of the "old" wiring is still attached to the ballast and 4 lamp holders. If you start cutting wires, it is just more unneeded steps.
I also wanted to show you the difference in shunted vs. non-shunted lamp holders. If you choose a single ended power bulb kit like the one I linked to above, you will have non shunted lamp holders at the powered end and each have a black wire and a white wire. If you instead choose double ended power bulbs, each lamp holder would be shunted and only have one wire for each lamp holder.
NOTE: My only concern about your particular installation is that your existing white lamp holders look strange and I cannot tell how they pop out and new ones attach. You have shunted lamp holders, so if you go with single ended power bulbs like I prefer, the existing lamp holders have to be replaced. I cannot tell if the Toggled lamp holders (which are the standard slide in slide out type) would work for your installation. If you ordered these from home depot, they would be an easy return. You may have that same issue with no matter what kit you buy, so that is another reason to buy from Lowes or Home Depot for an easier return if needed.
This post was edited on 3/28/21 at 2:57 am
Posted on 3/28/21 at 8:42 pm to 98eagle
quote:
98eagle
this is what I did...
I replaced two lights in the shop I had 4 fluorescents and have more light...

 Page 1 of 1


Popular
Back to top