- My Forums
- Tiger Rant
- LSU Recruiting
- SEC Rant
- Saints Talk
- Pelicans Talk
- More Sports Board
- Coaching Changes
- Fantasy Sports
- Golf Board
- Soccer Board
- O-T Lounge
- Tech Board
- Home/Garden Board
- Outdoor Board
- Health/Fitness Board
- Movie/TV Board
- Book Board
- Music Board
- Political Talk
- Money Talk
- Fark Board
- Gaming Board
- Travel Board
- Food/Drink Board
- Ticket Exchange
- TD Help Board
Customize My Forums- View All Forums
- Show Left Links
- Topic Sort Options
- Trending Topics
- Recent Topics
- Active Topics
Started By
Message
Tips for door weatherstripping
Posted on 2/11/25 at 10:07 pm

Posted on 2/11/25 at 10:07 pm
Today, I replaced the weatherstripping on my doors, as the original strips had been in place for over 16 years. Some had dried out, while others had developed gashes from wear and tear over time.
My doors and trim are white. Here’s the finished result after installing the new weatherstripping on my side door.


 [/img]
The "light" that you see or what appears to be light is the actual weatherstripping, except for the very bottom. To combat the light that actually gets through, I ordered these:

By comparison, here is another door (rear door) where I installed the weatherstripping as well. This door seals perfectly. It also appears the door frame might be a tad bit smaller (not as wide) as my side door frame.

From what I can tell from the outside and inside, my doors are "sealed" and no outside air is getting through, except for the one little spot I mentioned earlier (I need to confirm this with a thermal gun). I'm not crazy about the "gap" of the side door that I see --- it's most likely always been there and I didn't notice it because the previous weatherstripping was a dark brown/black.
I’m having an issue with locking my side door. The top lock is a deadbolt, and the bottom is a dummy handle with no lock. To lock the door, I have to push it against the frame to allow the deadbolt to engage; otherwise, it won't line up with the striker plate. The weatherstripping is installed correctly, so I’m wondering: what can I do to allow the door to close and seal properly without having to apply pressure for the deadbolt to engage? Will I have to adjust the striker plate? Or make an adjustment to the door hinges?
My doors and trim are white. Here’s the finished result after installing the new weatherstripping on my side door.
[/img] The "light" that you see or what appears to be light is the actual weatherstripping, except for the very bottom. To combat the light that actually gets through, I ordered these:
By comparison, here is another door (rear door) where I installed the weatherstripping as well. This door seals perfectly. It also appears the door frame might be a tad bit smaller (not as wide) as my side door frame.
From what I can tell from the outside and inside, my doors are "sealed" and no outside air is getting through, except for the one little spot I mentioned earlier (I need to confirm this with a thermal gun). I'm not crazy about the "gap" of the side door that I see --- it's most likely always been there and I didn't notice it because the previous weatherstripping was a dark brown/black.
I’m having an issue with locking my side door. The top lock is a deadbolt, and the bottom is a dummy handle with no lock. To lock the door, I have to push it against the frame to allow the deadbolt to engage; otherwise, it won't line up with the striker plate. The weatherstripping is installed correctly, so I’m wondering: what can I do to allow the door to close and seal properly without having to apply pressure for the deadbolt to engage? Will I have to adjust the striker plate? Or make an adjustment to the door hinges?
This post was edited on 2/11/25 at 10:08 pm
 5
5


Posted on 2/11/25 at 10:18 pm to Will Cover
I replaced mine last month. Those corner pieces will help you out. Is there a chance you aren't getting a fully closed door because of the redneck job on your deadbolt strike? Someone probably did that because they ran out of room with the tiny screws those come with. Someone mentioned awhile back to get 2 1/2" screws for security purposes, so maybe do that. See if the plate is part of the problem, because my only gas came at the corner.
EDIT:
Reading more and looking at your strike plates, bring those a tiny bit closer to the inside. The deadbolt one looks like it was pushed back towards the trim. It also looks like your strike plate on the door knob is digging into the frame inside of the house, likely from short screws being attached and forcing them further back when you push hard against the door. You still want those square strips.
I would also advise replacing your door sweep if are capable of doing so.
This post was edited on 2/11/25 at 10:24 pm
Posted on 2/11/25 at 10:18 pm to Will Cover
Adjusting striker plate seems like a much easier option.
Posted on 2/11/25 at 10:21 pm to BilbeauTBaggins
quote:
Someone mentioned awhile back to get 2 1/2" screws for security purposes, so maybe do that.
I actually have 2.5" screws screwed into the door frame right now.
quote:
Those corner pieces will help you out.
Arriving tomorrow, I agree -- this should help.
quote:
Is there a chance you aren't getting a fully closed door because of the redneck job on your deadbolt strike?
I'm going to take a look at the striker plate tomorrow and make adjustments, if I can.
Posted on 2/12/25 at 8:34 am to Will Cover
moving the strike plate will help out but time will help it out also. that's compression weatherstripping so it'll take it some time to get "broken in" and compress better to allow the door to close as it did before.

Posted on 2/12/25 at 8:57 am to Will Cover
What kind of redneck shite is this?
Posted on 2/12/25 at 9:48 am to TheGodfather
quote:
moving the strike plate will help out but time will help it out also. that's compression weatherstripping so it'll take it some time to get "broken in" and compress better to allow the door to close as it did before.
Same happened with a door I did. Had to push it closed initially but after a few months the door closes easily. Might have happened after a couple weeks but it's a side door we don't often use.
Next time I do a door I'll aim for the same result.
Posted on 2/12/25 at 10:35 am to BMoney
I agree, it's terrible looking.

Posted on 2/12/25 at 11:00 am to Will Cover
Which weather stripping product did you use?
I need to replace it on a few of my doors but haven't really looked into which product is best to use yet.
I need to replace it on a few of my doors but haven't really looked into which product is best to use yet.
Posted on 2/12/25 at 1:28 pm to DukeSilver
I believe the brand at Lowe's where I purchased it from is M&L. I chose the rubber weatherstripping. This was rated better than the other option, vinyl foam.
Posted on 2/12/25 at 1:36 pm to DukeSilver
Masonite - 36 in. x 80 in. Compression Weatherstrip Kit
Masonite - 36 in. x 80 in. Compression Weatherstrip Kit
36 in. x 80 in. Compression Weatherstrip Kit
by Masonite
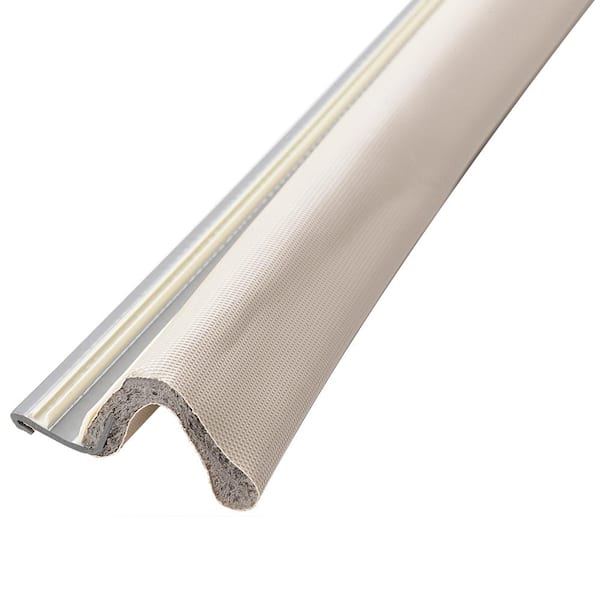
This is what I used from HD. Probably similar product at Lowe's. You can wedge it in with a rubber spatula.
Tip: when cutting the strips you're replacing, use the old weather strip you have and use that length. I watched a video after replacing the weather stripping on a second door and should've listened to that, because I measured it with a tape measure on the first door and got nervous it wouldn't look good.
Masonite - 36 in. x 80 in. Compression Weatherstrip Kit
36 in. x 80 in. Compression Weatherstrip Kit
by Masonite
This is what I used from HD. Probably similar product at Lowe's. You can wedge it in with a rubber spatula.
Tip: when cutting the strips you're replacing, use the old weather strip you have and use that length. I watched a video after replacing the weather stripping on a second door and should've listened to that, because I measured it with a tape measure on the first door and got nervous it wouldn't look good.

 Page 1 of 1


Back to top