- My Forums
- Tiger Rant
- LSU Recruiting
- SEC Rant
- Saints Talk
- Pelicans Talk
- More Sports Board
- Fantasy Sports
- Golf Board
- Soccer Board
- O-T Lounge
- Tech Board
- Home/Garden Board
- Outdoor Board
- Health/Fitness Board
- Movie/TV Board
- Book Board
- Music Board
- Political Talk
- Money Talk
- Fark Board
- Gaming Board
- Travel Board
- Food/Drink Board
- Ticket Exchange
- TD Help Board
Customize My Forums- View All Forums
- Show Left Links
- Topic Sort Options
- Trending Topics
- Recent Topics
- Active Topics
Started By
Message
re: Post your Woodworking Projects
Posted on 5/7/19 at 8:54 pm to WITNESS23
Posted on 5/7/19 at 8:54 pm to WITNESS23
I use chill ice epoxy from Polymeres Technology. It is not cheap by any means, but it is leaps and bounds better than anything.
As for the bits. I use at least two, sometimes three different bits for my cutouts. After I do my chiseling I do my edges with this guy: it’s a Whiteside carving liner. It’ll make a nice fine edge for you.

I’ll follow that up with a simple thinner straight bit to get my edge a little larger.
Then finish with a larger diameter straight bit to “gut” the rest out.
As for the bits. I use at least two, sometimes three different bits for my cutouts. After I do my chiseling I do my edges with this guy: it’s a Whiteside carving liner. It’ll make a nice fine edge for you.
I’ll follow that up with a simple thinner straight bit to get my edge a little larger.
Then finish with a larger diameter straight bit to “gut” the rest out.
This post was edited on 5/7/19 at 8:55 pm
 0
0

Posted on 5/8/19 at 1:20 am to King George
Somebody's racking UP onda brownie points baw!
HELL of a job!
Do me one next?
HELL of a job!
Do me one next?
Posted on 5/11/19 at 7:32 pm to Drunken Crawfish
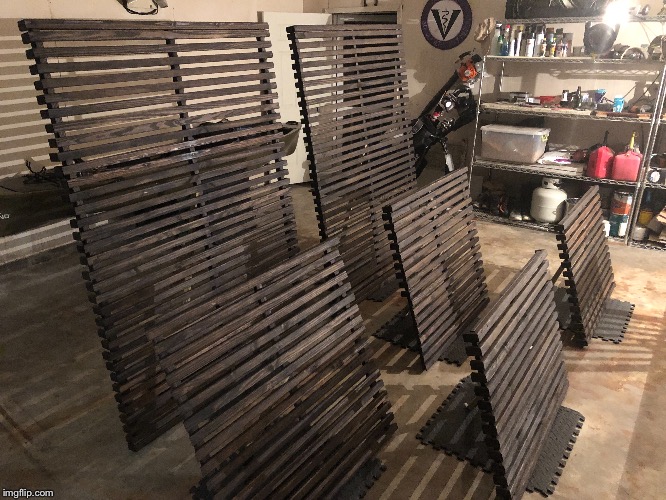
My house is board on board cedar, and the shutters just got mailed in by whoever built the house. My wife and I priced bahama blinds, and I figured, “Hey I’m broke. I’ll make my own.” I found a design that I thought would look cool, so I took a crack at it.
I made a practice blind for the laundry room on a side of the house that wouldn’t be very noticeable from the street. It came out ok.
I’m not proud of this, but anyway

After I hung it, I realized the spacing was wrong and the build quality was poor.

I stained it, just to get an idea of how that would look. It didn’t help with the spacing, but it helped make a decision about the finish.
I regrouped and redoubled my efforts, mainly by buying a miter saw instead of making all the GD 45° angle cuts with a miter box and a hand saw. So, I rebuilt it along with some for other windows and a couple for the bay windows.
I started on May 4th

1.5” end cap

Lots

74” x 50”

Laundry room windows
38”x40”

Bay windows
38”x26”

Sanded and stained the caps
Gonna glue and nail them on tonight


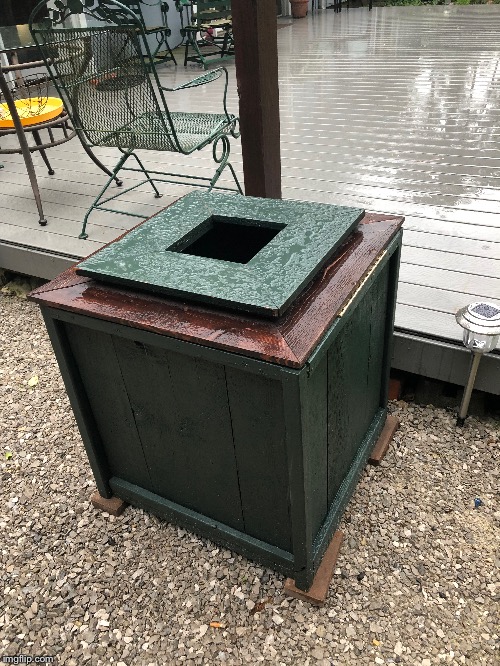
Because I’ve been told never to toss scrap (I respect wood), I used the old shutters to make a one of a kind authentic replica Masters driving range waste receptacle for the patrons
I also used them to close in my smoke island

90% done
Anyway, I think what we all learned is that miter saw>miter box/hand saw.
Happy Mother’s Day baws
Love,
Net
I made a practice blind for the laundry room on a side of the house that wouldn’t be very noticeable from the street. It came out ok.
I’m not proud of this, but anyway
After I hung it, I realized the spacing was wrong and the build quality was poor.
I stained it, just to get an idea of how that would look. It didn’t help with the spacing, but it helped make a decision about the finish.
I regrouped and redoubled my efforts, mainly by buying a miter saw instead of making all the GD 45° angle cuts with a miter box and a hand saw. So, I rebuilt it along with some for other windows and a couple for the bay windows.
I started on May 4th
1.5” end cap
Lots
74” x 50”
Laundry room windows
38”x40”
Bay windows
38”x26”
Sanded and stained the caps
Gonna glue and nail them on tonight
Because I’ve been told never to toss scrap (I respect wood), I used the old shutters to make a one of a kind authentic replica Masters driving range waste receptacle for the patrons
I also used them to close in my smoke island
90% done
Anyway, I think what we all learned is that miter saw>miter box/hand saw.
Happy Mother’s Day baws
Love,
Net
This post was edited on 5/11/19 at 11:25 pm
Posted on 5/11/19 at 10:46 pm to BRgetthenet
Great work.
Posted on 5/11/19 at 10:46 pm to BRgetthenet
Nice work!
I enjoy learning from mistakes (I make a lot), and finding a purpose for scraps brings a certain sense of satisfaction as well. Your "scrap" pieces turned out great.
I enjoy learning from mistakes (I make a lot), and finding a purpose for scraps brings a certain sense of satisfaction as well. Your "scrap" pieces turned out great.

Posted on 5/14/19 at 10:15 am to TIGERBAIT84
quote:
TIGERBAIT84
Alright baw, I got motivated b/c I had a free Saturday. Need some input on what you think I should do inlay-wise (if anything).
First cutting board with hard maple, walnut and purple heart (who knew that they also have red heart which is what I'll use for the next project)


Problems I came across:
1, Definitely need better clamps. The clamps I had are 14" ones so I had to dongle them together and unfortunately that doesn't equate to equal pressure where you need it. Have new ones on order.
2. General purpose blades aren't too friendly for this type of wood. Note, definitely use a mask of some sort as purple heart is an irritant.
3. Although you can't really tell, I did not use an electrical planer. Used a scraper and sanded the crap out of it with 80/120/400/1200.
4. Next time, I'll route out the bottom finger-holds instead as this was essentially a test piece that I'll end up giving to someone once finished.
Onto the next project and any input from all you guys would be appreciated
Posted on 5/14/19 at 11:05 am to idlewatcher
Did you get s4s lumber? If so, was it reasonably priced? I have wanted to do some cutting boards but I don't have the tools to plane anything at the moment.
Posted on 5/14/19 at 12:59 pm to idlewatcher
Leave that board alone!! You smashed that project. No need to inlay anything in my opinion.
A problem I had when I first started out was to “keep going” with a piece. I’d want to take it farther and farther and add more and more to it. Typicallythis caused two things to happen, me mess up and ruin a good thing or me make a piece that was just too busy.
If you want to take that piece over the top and work more on it; do this: sand to 400 grit. Add Odie’s oil as your finish.
As for clamps, splurge and get yourself two 24” Jet clamps. They would do the job on binding almost all glue ups you’ll do. Keep yourself a stock of lower end clamps to have and extra, but I cannot stress how great these are. I always tend to grab a $10 pipe clamp or two every other time I hit Lowe’s/homedepot. Your stock will eventually build.
Posted on 5/14/19 at 1:01 pm to idlewatcher
Here’s a few of my recent builds.


Posted on 5/14/19 at 1:18 pm to idlewatcher
(no message)
This post was edited on 10/19/21 at 1:36 pm
Posted on 5/14/19 at 1:36 pm to idlewatcher
That looks great but I’m interested to see how well it holds up. Glueing end grain like that makes for a very weak joint.
Posted on 5/14/19 at 2:10 pm to idlewatcher
(no message)
This post was edited on 5/14/19 at 3:08 pm
Posted on 5/14/19 at 2:15 pm to Chuckd
If Titebond was used. If it was clamped for 18-24 hours, if it’s oiled/waxed and if it’s not mistreated— submerged in water or dishwasher, it’s shouldn't have issues.
In most cases these blocks are used for ascetic purposes. Serving, cheese, charcuterie. If your looking for a work horse block, use the largest and driest possible timber and end grain it. Oil for a month before using. It’ll never let you down.
In most cases these blocks are used for ascetic purposes. Serving, cheese, charcuterie. If your looking for a work horse block, use the largest and driest possible timber and end grain it. Oil for a month before using. It’ll never let you down.
Posted on 5/14/19 at 2:23 pm to Drunken Crawfish
quote:
Did you get s4s lumber? If so, was it reasonably priced?
Yes sir, sure did. It was $75 bones for all the wood plus the glue (Tec whatever #3 which supposedly is food grade). The place was really cool too named Houston Hardwoods. Fortunately the guy who was helping me also is a novice woodworker and he was really interested to help me.
quote:
I have wanted to do some cutting boards but I don't have the tools to plane anything at the moment
The shop will also mill it down to size for an extra 5-10 bucks on their planer. Worth it if you only do occasional projects and don't want to invest in an actual planer; however, it will become necessary once you get bitten by the woodworking bug. Good luck and show us what you're working on
Posted on 5/14/19 at 2:26 pm to TIGERBAIT84
quote:
@Idle, email me:
Done
Posted on 5/14/19 at 2:28 pm to lsutiger2010
quote:
lsutiger2010
Hey man, I'm in it to learn anything I can so thanks for the heads up
Posted on 5/14/19 at 2:31 pm to TIGERBAIT84
(no message)
This post was edited on 10/19/21 at 1:36 pm
Posted on 5/14/19 at 2:34 pm to idlewatcher
(no message)
This post was edited on 10/19/21 at 1:30 pm
Posted on 5/14/19 at 2:55 pm to idlewatcher
Also, what kind of oil did you use to seal/protect it?
Posted on 5/14/19 at 3:01 pm to lsutiger2010
Not looking for a pisssing match, but to each is own. Titebonds site specifically states don’t stress any joint for 24 hour. Why not clamp em for 24? I guess I’m old school, but I don’t rush to unclamp.
Also, again, it goes back to the use and care in my opinion. I have a board that’s five years old that has this same minus two joints layout. It has set on my countertop in the same spot as an accent piece. It’s still the same shape as day one.
If we’re getting specific, the photo you provided can go out of the window if we don’t know moisture contents? Kiln dried? Atmosphere of the area it’ll be used in?

 Page 8 of 17

Popular
Back to top