- My Forums
- Tiger Rant
- LSU Recruiting
- SEC Rant
- Saints Talk
- Pelicans Talk
- More Sports Board
- Fantasy Sports
- Golf Board
- Soccer Board
- O-T Lounge
- Tech Board
- Home/Garden Board
- Outdoor Board
- Health/Fitness Board
- Movie/TV Board
- Book Board
- Music Board
- Political Talk
- Money Talk
- Fark Board
- Gaming Board
- Travel Board
- Food/Drink Board
- Ticket Exchange
- TD Help Board
Customize My Forums- View All Forums
- Show Left Links
- Topic Sort Options
- Trending Topics
- Recent Topics
- Active Topics
Started By
Message

 0
0

Posted on 11/7/24 at 4:41 pm to lsuson
Update on the table. I know it’s been a minute. Did the epoxy pour in two pours due to the heat. Well the second pour was a screw up. My ratio had to be off and it never hardened completely. So I had to take it off and pour again. Lots of cursing ensued but I wasn’t giving up.
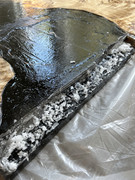
First pic is trying to get the epoxy off with a heated putty knife. That process was too slow
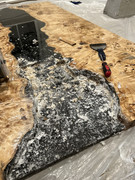
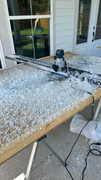
Finally got smart and used a router with a flattening bit and that worked great. Just super messy. Epoxy shavings went everywhere.
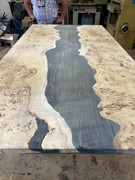
Second pour went great and it finally hardened.
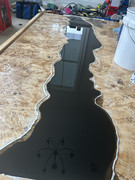
Just got it back from getting sanded on the belt sander. Very happy with it. Now the fun part of lots of sanding.
First pic is trying to get the epoxy off with a heated putty knife. That process was too slow
Finally got smart and used a router with a flattening bit and that worked great. Just super messy. Epoxy shavings went everywhere.
Second pour went great and it finally hardened.
Just got it back from getting sanded on the belt sander. Very happy with it. Now the fun part of lots of sanding.
Posted on 11/7/24 at 10:09 pm to lsuson
Looks great! I milled some slabs from a tree in 2019 and still haven’t started making anything with them. Maybe this will inspire me to get going. Are you going to put in C channels to keep it flat?
Posted on 11/8/24 at 1:10 pm to Big L
The table is flat. It shouldn't flex. If you milled slabs in 2019 and they were stored inside they should be good to work with. I'd buy a moisture meter to test the slabs first. You want under 10%.

 Page 2 of 2


Popular
Back to top