- My Forums
- Tiger Rant
- LSU Recruiting
- SEC Rant
- Saints Talk
- Pelicans Talk
- More Sports Board
- Fantasy Sports
- Golf Board
- Soccer Board
- O-T Lounge
- Tech Board
- Home/Garden Board
- Outdoor Board
- Health/Fitness Board
- Movie/TV Board
- Book Board
- Music Board
- Political Talk
- Money Talk
- Fark Board
- Gaming Board
- Travel Board
- Food/Drink Board
- Ticket Exchange
- TD Help Board
Customize My Forums- View All Forums
- Show Left Links
- Topic Sort Options
- Trending Topics
- Recent Topics
- Active Topics
Started By
Message
Any pre-made uncooked pizza crusts worth a damn?
Posted on 7/28/16 at 7:20 pm
Posted on 7/28/16 at 7:20 pm
Would like to start making pizza at home with something better than the ones rouses has that are somewhat finished.
Any recs?
Any recs?
 9
9

Posted on 7/28/16 at 7:22 pm to Thib-a-doe Tiger
if you mean raw pre-made pizza dough balls, Alexander's and Whole foods sells them
Posted on 7/28/16 at 7:23 pm to clownbaby
Yeah I didn't know what they were called
Posted on 7/28/16 at 7:24 pm to Thib-a-doe Tiger
Yeah, if you go to the deli counter at Alexander's, pretty sure you can get 2 for less than $5. Same thing at Whole foods, just go to the pizza station.
Posted on 7/28/16 at 7:29 pm to Thib-a-doe Tiger
Do you have a kitchen-aid stand mixer?
Posted on 7/28/16 at 7:35 pm to Thib-a-doe Tiger
Jim Lahey no-knead pizza crust recipe. It's four ingredients, super easy, requires no special equipment, super cheap, and freezes well.
LINK
LINK
This post was edited on 7/28/16 at 7:36 pm
Posted on 7/28/16 at 7:35 pm to KosmoCramer
No
Posted on 7/28/16 at 7:36 pm to Thib-a-doe Tiger
Bandit can make you a beer crust with all the Ghost he has
Posted on 7/28/16 at 7:42 pm to MNCscripper
Don't like flatbread pizza

Posted on 7/28/16 at 8:02 pm to Thib-a-doe Tiger
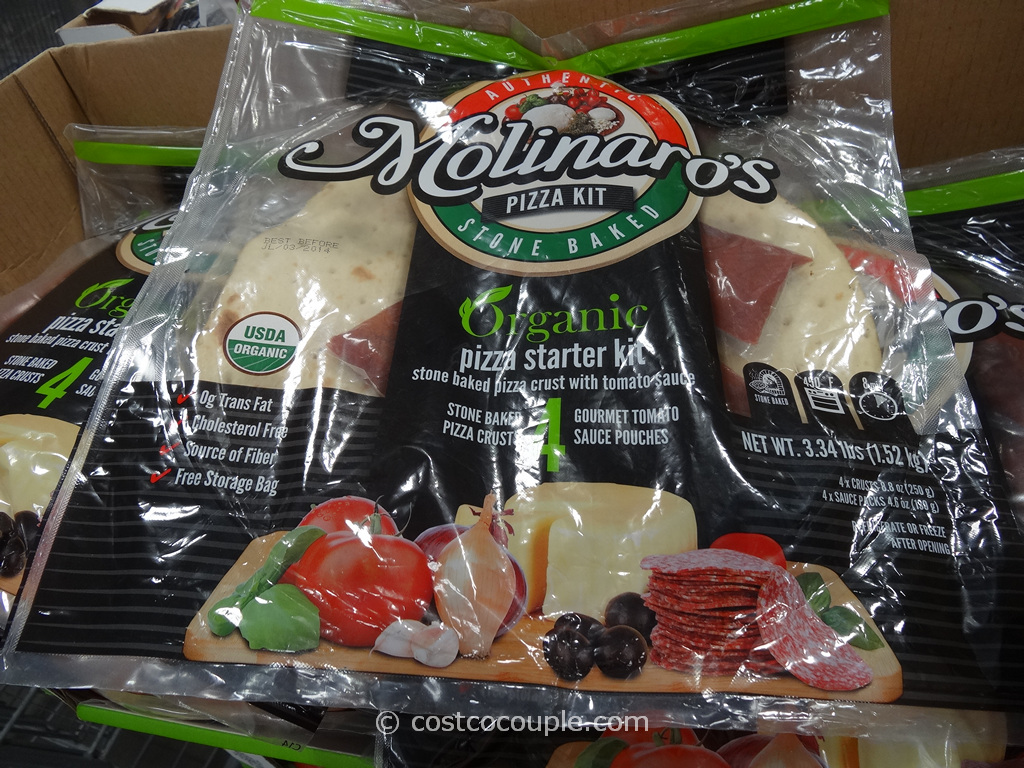
Not sure what type of crust you are looking for but Costco sells a set of 4 premade pizza crust, comes with sauce as well. We make different ones and cook them on the Komado. Buy both mozzarella and provelone and misc toppings.

Posted on 7/28/16 at 8:09 pm to MNCscripper
It's funny that you think Bandit is giving Thibby anything...much less his Ghost.
eta: Not that Thibby doesn't deserve it or anything
eta: Not that Thibby doesn't deserve it or anything
This post was edited on 7/28/16 at 8:10 pm

Posted on 7/28/16 at 8:12 pm to Thib-a-doe Tiger
I sometimes buy Mama Mary's crusts from Zuppardo's. They're a little over $4 for 2 thin crusts. I've tried Boboli's, but I found them too sweet.
If you want to make your own and freeze for future use, here is Peter Reinhart's recipe from American Pie for
Prebaked Pizza Freezer Dough
This is the way to go if you want to throw a great pizza together on a moment’s notice. I always have a few prebaked pizza crusts in the freezer, and they perform amazingly well. The key to a twice-baked dough is to make it with lots of water so that it doesn’t turn into something reminiscent of cardboard after the second baking. Most commercial frozen pizzas emphasize the toppings because the manufacturers know the crusts are going to be inferior to pizzeria crusts. When Freschetta, DiGiorno, and even the California Pizza Kitchen came up with their new oven-rising crusts, they found a way to eliminate the factory bake that stabilizes the dough. Instead, they flash-freeze the still-active unbaked dough so that it will have some rise in it during the final bake. These products are good and sales show that the public clearly loves them. In early 2003, these three companies alone were producing more than two hundred thousand oven-rising pizzas every day. Yet even with this new technology, a frozen oven-rising crust is still not as good as a pizzeria crust. Nor do I believe it is as good as the following prebaked crust, which, in addition to the extra water, benefits from a long fermentation period. Try this crust side by side with the leading freezer brands and I think you’ll agree.
4 ½ cups (20 ¼ ounces) unbleached high-gluten or bread flour
½ cup (2 ¼ ounces) whole-wheat flour
2 tsp table salt or 3 ½ teaspoons kosher salt
1 ¼ tsp instant yeast
3 Tbs honey
2 cups plus 2 tablespoons ice-cold water (40°F)
¼ cup olive oil
Unbleached high-gluten or bread flour, cornmeal, or semolina flour for dusting peel
1. With a large metal spoon, stir together all the ingredients except the olive oil in a 4-quart bowl or the bowl of an electric stand mixer until combined. If mixing with an electric mixer, fit it with the paddle attachment and mix on low speed for about 2 minutes, or until all the ingredients are hydrated and begin to form a wet ball of dough. Let the dough rest for 5 minutes. Switch to the dough hook, add the olive oil, and resume mixing on medium-low speed for 3 to 4 minutes, or until the all of the oil is incorporated and the dough is sticky, supple, and smooth; it should clear the sides of the bowl and stick just a little to the bottom. If the dough seems like a batter and does not have sufficient structure to hold itself together, mix in more flour by the tablespoonful. Even though it is sticky, the dough should pass the windowpane test. If mixing by hand, repeatedly dip one of your hands or the spoon into cold water and use it much like a dough hook, working the dough vigorously as you rotate the bowl with your other hand. As all the flour is incorporated and the dough becomes a wet ball, about 3 minutes, stop mixing and let the dough rest for 5 minutes. Then add the olive oil, dip your hand or spoon again in water, and continue to work the dough for another 3 to 4 minutes. The dough should be very sticky, but it should also have some texture and structure. If the dough seems like a batter and does not have sufficient structure to hold itself together, mix in more flour by the tablespoonful. Even though it is sticky, the dough should pass the windowpane test.
2. Form the dough into a ball and place it in a bowl brushed with olive oil. Turn the dough to coat it with the oil, and cover the bowl with plastic wrap. Let the dough sit at room temperature for 30 minutes, then put the bowl in the refrigerator overnight.
3. The next day, remove the bowl of dough from the refrigerator 3 hours before you plan to bake the crusts. The dough should have nearly doubled in size. Using a plastic bowl scraper dipped in water, or using wet hands, gently transfer the dough to a floured counter, trying to degas the dough as little as possible. Using a pastry blade that has been dipped in water, divide it into 4 equal pieces. Gently round each piece into a ball and brush or rub each ball with olive oil. Line a sheet pan with baking parchment or a nonstick silicone baking liner and brush with olive oil. Place each dough ball on the pan and loosely cover the pan with either plastic wrap or a food-grade plastic bag. Allow the dough balls to sit at room temperature for 2 hours to relax the gluten and to take off the chill.
4. Place a baking stone on the middle shelf of the oven (unless you know your oven well enough to place it on a different shelf) and preheat on the highest setting for at least 1 hour. While the oven is heating, uncover the balls of dough on the pan, dip your hand in some room-temperature water, and flatten each piece of dough into a thick, round disk. Separate the disks so they are not touching each other; if necessary, transfer some of the pieces to another sheet pan prepared in the same manner. Cover the disks with the plastic and let them relax at room temperature for 15 to 20 minutes.
5. One at a time, begin to work the disks of dough into rounds 10 inches in diameter, using the method for shaping on the counter. (The wet, sticky nature of this dough makes it difficult to toss and spin it, as you would for other high-gluten doughs.) As each piece begins to get springy and refuses to extend any farther, move on to another. Return to each disk after it has rested for about 5 minutes, which allows time for the gluten to relax. Eventually all the disks will achieve the desired size.
6. Transfer the first dough round to a peel or an inverted sheet pan that has been dusted with flour, sliding it around to make sure it is not sticking. If it sticks, lift the dough and sprinkle the peel with more flour. Brush the top of the dough with olive oil and prick the entire surface with a fork to minimize bubbling in the oven. Check again to be sure the dough is not sticking to the peel, then slide the dough round onto the baking stone. (If your baking surface is large enough to hold 2 dough rounds at the same time, go ahead and bake 2 rounds at once.) Bake for 10 to 12 minutes, or until the dough is set and is just beginning to show signs of browning. If the dough puffs up like a pita bread, poke it with a fork to deflate.
7. Remove the baked crust from the oven and place it on a cooling rack. Repeat the process with the remaining dough rounds. Let the crusts cool completely, then double wrap them individually in plastic wrap and freeze for up to 3 months. You can top and bake the crusts while they are still frozen, or you can thaw them before topping. In either case, they will crisp up nicely during the rebake. If the crusts are thawed, the rebaking time will be about the same as a pizza made from scratch. If the crusts are frozen, add 2 additional minutes to the bake.
Yield: Makes four 10-inch prebaked crusts
Author: Peter Reinhart
Source: American Pie

Posted on 7/29/16 at 1:21 am to Thib-a-doe Tiger
Another vote for Lahey's crust. So easy and so good.
Posted on 7/29/16 at 6:27 am to Gris Gris
You can get a case, 25 I think, from Sam's for $16. We use them making pizzas on the green egg all the time.
Posted on 7/29/16 at 9:02 am to latech15
quote:
You can get a case, 25 I think, from Sam's for $16. We use them making pizzas on the green egg all the time.
This. I use the Lahey method, but before I started doing that I bought the dough balls from Sam's. They're very good and very cheap, and come individually bagged.
Posted on 7/29/16 at 9:10 am to Thib-a-doe Tiger
Lots of inconsistency issues. Similar to brewing IPAs.
I suspect you'll bitch about the crusts after a few uses.
I suspect you'll bitch about the crusts after a few uses.
Posted on 7/29/16 at 11:01 am to Thib-a-doe Tiger
trader joes has some good ones
Posted on 7/29/16 at 11:44 am to GEAUXT
Had Trader Joe's at a friend's house a few weeks ago for the first time. He cooked it on a big green egg and it was really good crust.
This post was edited on 7/29/16 at 11:45 am
Posted on 7/29/16 at 1:29 pm to Thib-a-doe Tiger
Ones from Costco

Posted on 7/29/16 at 4:05 pm to t00f
Pre-cooked pizza crust? 

 Page 1 of 2

Back to top